

A big question I always get is: How are accurate titrations conducted?
 Frank AltmayerI first learned about this subject many years ago when I started working at Scientific Control Labs. While it seems easy to watch someone perform a titration, a significant amount of skill is involved, and I hope to help you develop it.
First, without giving you a whole lecture on safety, be sure you wear eye and skin protection when titration and preparing a sample for titration, as you will most likely be handling some highly corrosive and toxic chemicals.
Methods of Measuring Volumes
Next, let’s discuss methods of measuring volumes because titrations are most accurate and repeatable if we measure volumes of liquids accurately. Volumes can be measured using volumetric flasks, graduated cylinders, and pipets. Your analytical procedure will typically state what measuring device you should use. If the text states, “Add 5 mL of XYZ,” you can feel secure using a (relatively) crude measuring device such as a graduated cylinder. If the text states, “pipet 5 mL of XYZ,” we will need to use a pipet, which can be considerably more accurate.
 Figure 1Pipets come in varying designs. One is the Mohr pipet, which is graduated along its length to various volumes (see Figure 1). It is tempting to use these because they appear more versatile, allowing you to use one pipet to deliver 1, 2, or even 1.2 mL of liquid. However, Mohr pipets require you to measure a volume by allowing the liquid to flow from one gradation to another. Depending on your eyesight, skill level, and attention span, you may be able to deliver 5.0 mL of reagent XYZ, but more likely you will deliver more or less than 5 mL. Therefore, I do not recommend using these pipets to accurately measure volumes. They can be used when accuracy is not critical.
A far more accurate method of measuring volumes is the single-volume pipet (also shown in Fig. 1). These come in two styles: “to deliver” and “to contain.” They also come in class “A” and “B” accuracy levels. For most plating labs, either class A or B will suffice. Always use a “to deliver” pipet, as it is impossible to blow out all of the liquid in a pipet, affecting accuracy.
The “to deliver” pipet will still have some liquid in the tip after it drains. This is normal. Do not shake or blow out this liquid. Do not use any pipet that has a damaged tip, as this will affect its accuracy.
Using a Vacuum Tool
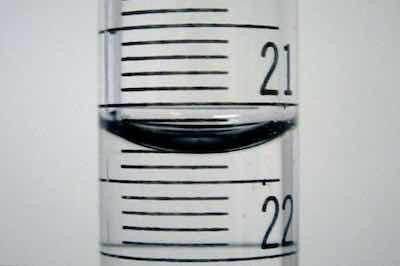 Figure 2While old-timers like me remember pipetting a sample using the vacuum supplied by their mouth, this is a big no-no now. Safety concerns—and hygiene—dictate that a sample be drawn up a pipet using a vacuum tool instead of your mouth. Numerous devices for sale will work reasonably well. In our laboratory, we found a rubber bulb with a plastic end for drawing the sample, which works extremely well and efficiently.
Since we will be working with liquids in glass tubes (pipets and burets), we need to cover the topic of a meniscus. When a liquid is placed into a narrow vessel, surface tension effects cause the liquid to deform into a curl called a meniscus (figure 2). Pipets and burets are designed so that the bottom of the meniscus produced by contained liquids is used for volume measurement.
When a sample is pipetted from the sample container, the liquid is drawn past the meniscus line on the pipet. The vacuum device is removed, and a (gloved) finger is placed over the end of the pipet. Enough pressure must be applied to prevent the liquid from leaving the pipet. Before the liquid is transferred to another vessel, the finger pressure on the pipet must be slightly loosened so that it slowly drains back to its original container until the liquid reaches the meniscus line. When the bottom of the meniscus is lined up with the meniscus line, the finger pressure at the end of the pipet pipet is draining. If any partial drop of liquid hangs onto the pipet tip, touch the side of the sample container to remove this excess volume. The pipet will now deliver an exact volume to the next container.
Conduct the Titration
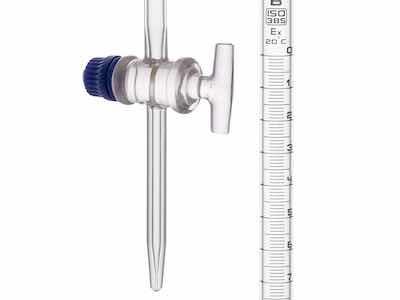 Figure 3Once a sample is measured and prepared for titration, it is brought to a buret stand to conduct the titration. We now need to discuss burets. They, too, come in numerous styles and designs. First, there is the “plain” buret (figure 3), which is a graduated glass tube with a stopper (properly called a stopcock). You fill the buret by pouring the reagent from a beaker into the top (make sure the stopcock is in the “closed” position). This can be messy and may require you to use a funnel.
The stopcock on a buret is critical to a successful titration yet is often ignored when choosing a buret. Avoid glass stopcocks; they require grease (stopcock grease, which is a silicone-based lubricant) to make a watertight seal. If the grease is not replaced frequently, the glass may seize, preventing you from turning the stopcock. A pair of pliers is usually applied to the frozen stopcock with disastrous results.
A far better choice for stopcock material is Teflon, as no grease is needed. Just make sure that the pressure knob applies enough pressure to the plastic washer so that the stopcock does not leak and yet turns smoothly with little effort.
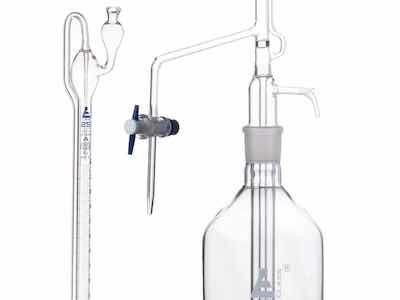 Figure 4Burets come in various volume capacities. Typically, you will want to use a buret containing enough volume for your range of titrations. Large-volume burets have gradations that allow volume measurements to 0.1 mL, while smaller-volume burets often allow volume measurements to 0.01 or 0.02 mL. A good general-purpose buret volume is 25 mL, with gradations down to 0.1 mL.
In addition to plain burets, there are self-zeroing burets (figure 4). These are more “delicate” and expensive, but eliminate the need to set the buret to zero with the meniscus. Another even more expensive buret is the electronic version, which allows you to turn a knob to deliver the reagent, and which reads the titration volume digitally. There are also automatic titration systems that eliminate the chemist's skill, but we will not cover these here.
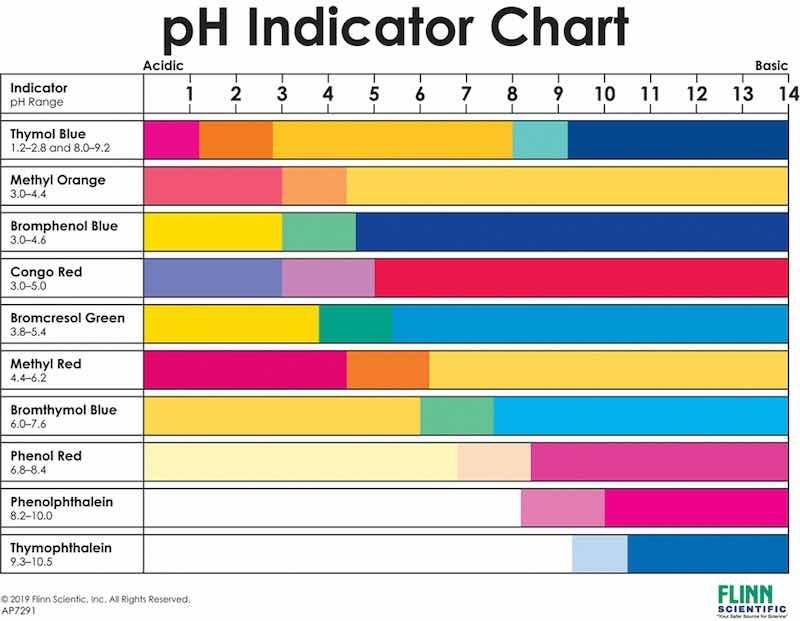 Figure 5: Common indicators and pH range.
Figure 6: Color change indicator.
| Name of indicator | Color at lower pH | pH range | Endpoint | Color at higher pH |
| methyl violet | yellow | 0.0 - 1.6 | 0.8 | blue |
| thymol blue | red | 1.2 - 2.8 | 2.8 | yellow |
| methyl orange | red | 3.2-4.4 | 3.7 | yellow |
| bromophenol blue | yellow | 2.8 - 4.6 | 4.0 | blue |
| bromocresol green | yellow | 3.8 - 5.4 | 4.7 | blue |
| methyl red | red | 4.2 - 6.3 | 5.1 | yellow |
| bromothymol blue | yellow | 6.0 - 7.6 | 7.0 | blue |
| thymol blue | yellow | 8.0 - 9.6 | 8.1 | blue |
| phenolphthalein | colorless | 8.2 - 10.0 | 9.3 | pink/violet |
| alizarin yellow | yellow | 10.1 - 13.0 | 12.5 | orange/red |
Types of Titrations
Let us now discuss the types of titrations conducted. They fall into:
- Acid-base
- Oxidation-Reduction
- Chelation
But let’s stick to acid-base titrations. These are the easiest to conduct in most cases (a boric acid determination is a big exception and is very difficult to do). In an acid-base titration, we will react with a known volume of either an acid or a base with the opposite reagent at a known concentration. For example, what if we wanted to know the caustic content of our alkaline cleaner? We would take a small known volume (let’s say 2 mL) and transfer it into a flask. De-ionized or distilled water is typically added for a more manageable volume. By reacting this known volume of cleaner with an acid of known strength, we will be able to use a simple math equation to determine the caustic content of the cleaner:
Va x Na = Vb x Nb
This equation states that the volume of an acid times its normality is equal to the volume of a base times its normality. We took a 2 mL sample of our “base,” the cleaner, so Vb = 2 mL. We don’t know the cleaner's strength, so Nb is unknown. By titrating with 0.1 normal sulfuric acid and measuring the volume necessary for neutralization, we will have Na = 0.1 and Va = to the titration volume. If, for example, the titration is 15 mL, the equation becomes:
15 x 0.1 = 2 Nb
Nb = 1.5/2 = 0.75
By definition, a 1 normal sodium hydroxide solution contains 40 g/L of NaOH. Our titration determined that our cleaner contains 0.75 normal or 40 x 0.75 = 30 g/L of sodium hydroxide.
Neutralizing the Caustic in the Flask
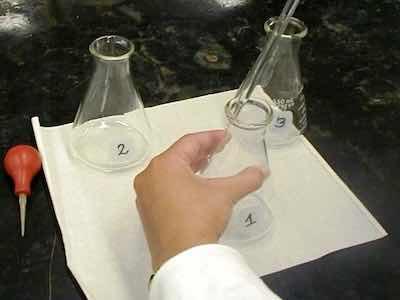 Figure 7So, how do we know when the acid has neutralized the caustic in the flask? The most common way to do this is to use a chemical “indicator.” Indicators are weak acid or weak base compounds that change color depending upon the pH level of the liquid in which they are injected. There are dozens of indicators, each responding to a certain pH range. The analytical procedure you will be following will specify which indicator to use. It is important not to substitute an alternate unless you know your chemistry. Figure 5 shows some common indicators and the pH range to which they respond. Figure 6 shows the color change when the pH changes from a higher value to a lower value.
Let’s go back to the titration. We add just a few drops of the indicator specified in the procedure. Don’t add too much; your sample may turn cloudy, and color changes may be hard to see. Typically, 3–4 drops is enough.
Fill the buret and “zero” the volume. We could begin titration at any volume level in the buret by writing down the initial reading, but this is not considered good practice (unless you are an “old pro”).
Once the buret is zeroed, we can begin the titration. The titration is conducted by swirling the flask with your right hand, grasping the stopcock properly (figure 7), and slowly adding a few drops of reagent from the buret into the flask. Note any color change at the point of entry. This will give you an idea of the color change at the end of the titration. If there is no color change, you can add the reagent faster until you see a color change at the point of entry (figure 8).
Nearing the Endpoint
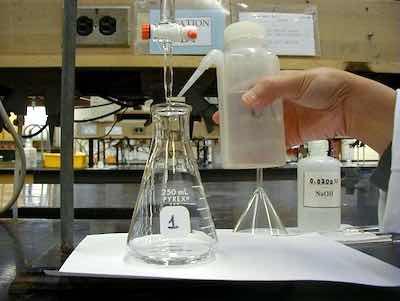 Figure 8As you continue to add reagent, the area of the color change spot in the flask will broaden. This is an indication that you are near “the endpoint.” At the endpoint, the color of the liquid in the flask will very quickly (in most cases) change, and you need to stop adding reagents immediately. With a little practice, a good chemist can change the entire volume of the flask’s color by adding a single drop (sometimes less than a drop) of reagent. A partial drop can be added by letting the drop hang from the buret tip and touching the inside of the flask to the drop.
A good way to practice is to make or purchase a 0.1 N solution of sodium hydroxide, a 0.1 N solution of sulfuric acid, and some phenolphthalein indicator (they are readily available from almost any chemical/plating supply house). Pipet 10 mL of the acid into a flask and add 2 mL of DI water and a few drops of phenolphthalein. Then, titrate the contents with the 0.1 normal sodium hydroxide until a pink color flashes on. If you are good, the titration will be exactly 10.0 mL.
Frank Altmayer is a Master Surface Finisher and an AESF Fellow, the technical education director of the AESF Foundation and NASF. He owned Scientific Control Laboratories from 1986 to 2007 and has over 50 years of experience in metal finishing. He received the AESF Past Presidents Award, NAMF Award of Special Recognition, AESF Leadership Award, AESF Fellowship Award, Chicago Branch AESF Geldzahler Service Award, and NASF Award of Special Recognition.