Q: Some of the sets of surrogate parts I test end up failing Coefficient of Friction even though I just remade my topcoat tank. Why is my testing yielding inconsistent results and falling outside the specification?
 James MaherA: Coefficient of Friction (CoF) requirements based on automotive specifications are becoming more common for fasteners processed throughout the finishing industry. Testing methods have been developed to ensure that topcoats have been correctly applied as torque tension modifiers so the fastener (normally a bolt or a nut) will work as intended in the final product, i.e. it takes so much force to install and/or remove the fastener, keeping it in place during operation. Despite well-defined methodology for testing coefficient of friction, it is not well understood among the applicators having to do the testing. When a set of bolts is tested and the CoF is not as intended, most applicators focus on the topcoat chemistry as the cause of the problem. Truth is, there are many variables a processed fastener is exposed to that can skew the results away from the passing values.
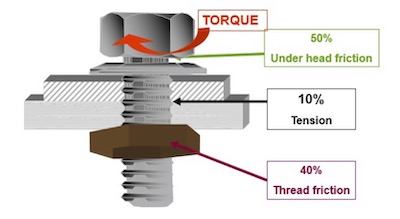
First, it would help to clarify what is being done when you use one of these instruments to determine the CoF. The CoF of a plated part can be modified by using a variety of post treatment processes including passivation, sealing, and of most impact, the Topcoat. Without a modifier, the CoF of the plated parts can have a wide range of variability. To ensure the CoF falls within the specified range, a Torque Tension instrument is used to determine this value. These instruments can vary in appearance and function, but they all operate under the same principal. A finished threaded fastener has a torque applied to it by the instrument (essentially it is twisted into a nut). The amount of force necessary to apply that torque creates tension on the fastener, which is measured by the instrument (see attached diagram). The instrument calculates the total friction based on several factors such as fastener geometry (size, thread pitch and type, etc.), type of washer and nut used, amount of torque applied and deflection of the force gauge yielding a value (coefficient) which is used for comparison and verification of the process.
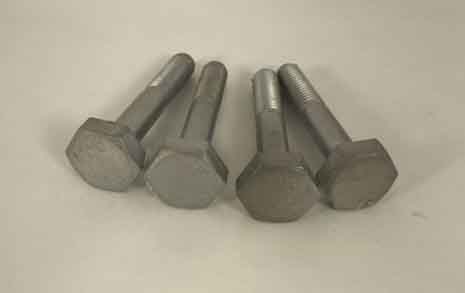
 Another major aspect that effects the CoF values is how the bolt sits against the washer during testing. When you measure the mating surface of the bolt you are assuming that the whole head of the bolt will be sitting flush against the washer. However, if there is nonuniform geometry on the under head of the bolt then it will not sit flat and will influence the measured value. ISO 16047 Section 10.2 has a clause that states that the value can be the total value of the clamp load or 75% of that value. To determine why this clause was in the specs, a series of tests were run to evaluate how changes in plating distribution, and hence bolt geometry changes, due to standard “dog bone” effect of the deposit might impact the CoF. Once the tests were finished, the results were demonstrated the extent to which this effect can affect the resultant CoF value. If the plating distribution was minimized via plating a lower current density, then the CoF results came in much more uniform. On the other hand, if the surrogates were plated in a high current density environment the resulting CoF had a large degree of variability, usually skewing the standard deviation out of the range. This becomes a compounding problem with the actual (measured) geometry of the bolt. While topcoats and sealers will certainly help combat the issue, they cannot fix it completely.
|
Process |
-3 Sigma |
Mean |
+3 Sigma |
Current Density |
|
Target |
0.10 |
0.13 |
0.16 |
7 ASF |
|
Zinc/Nickel Deposit, Clear Passivate, Topcoat |
0.12 |
0.14 |
0.16 |
3.5 ASF |
|
Zinc/Nickel Deposit, Clear Passivate, Topcoat |
0.20 |
0.16 |
0.13 |
14 ASF |
 It is therefore imperative to monitor your plating solution and plating parameters as they are just as important as making sure the topcoat is running effectively. If your plating solution isn’t being operated under conditions to minimize distributional deviations (parts being run at high current density and high metal concentrations enhance distribution differences), chances are your mating surface won’t be uniform. If one is trying to meet the tight specifications of an automotive approval, one should make sure the plating bath is in range prior to running test pieces. If line and bolt geometry constraint make even optimized plating parameters in combination with the topcoat still problematic for passing the specification, then it might be necessary to use the allowable mathematical correction for determining the actual mating surface area cited within the specification. By use of the computational correction, one may find that the parts that were being rejected were really passing all along.
James Maher is an Application Chemist at Coventya, Inc. He is based at the company’s Brooklyn Heights, Ohio facility. James joined Coventya in 2013 and has worked in the Technical Service Department since that time. Over the last 8 years, he has held multiple positions originally as an Intern then transitioning to Tech Service Lab Technician and now Application Chemist covering all product lines. As an Application Chemist, James plans, maintains, and executes pilot line testing of new products to support Product Management and Sales. In addition, he also provides technical support to customers and business partners to troubleshoot process challenges. James earned a Bachelor of Science degree in Chemistry from Cleveland State University in Cleveland, Ohio. He is a member of the NASF and is a Certified Electroplater Finisher (CEF) through the National Association for Surface Finishing (NASF). Visit https://www.coventya.com


