Rejects are the bane of any job shop’s existence when applying powder coatings.
 Fiona Levin SmithPulling apart out of the oven only to see whorls of orange peel powder, sections where the coating has sagged, or opacity issues bring a particular kind of dread alongside the question of what happened?
Appearance issues are those immediately visible defects found after a cure. They come in all shapes and sizes, and in this guide, we are going to cover the different types of defects, how they occur, and how to prevent them.
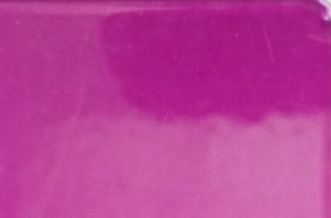
Blooming
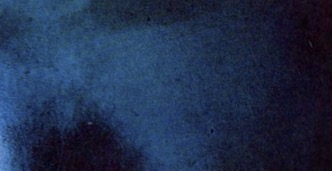
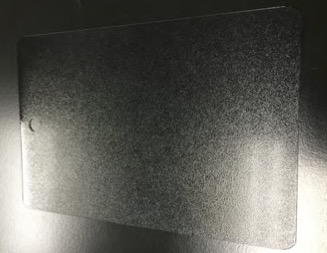
A lot of the time, blooming occurs when there are issues with the resin. More so with cheaper resins. Blooming looks like a foggy, hazy or smoky distortion in the resin, and if it does occur, shows up more noticeably on blacks, dark blues, dark greens, or, dark substrate. Blooming is caused by is either a poor resin – and then the only thing to do is to talk to your powder supplier about using a better resin (which will likely also be more expensive!) or when a coating is cured on too low of a temperature, especially when the metal is on the thicker side. Occasionally, high humidity causes, or contributes, to blooming as well. Luckily, most of the time this ‘fog’ like, white powdery residue can be wiped off with a wet cloth.
You can prevent blooming by carefully managing your oven. Crank up the temperature, especially for thicker substrates, so that the metal heats up faster and the part and powder gets to a higher temperature quicker. Or, chat to your powder coatings supplier about the different product possibilities with different resins.
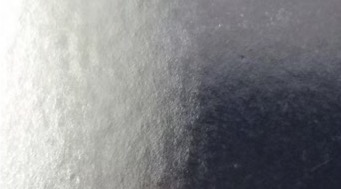
Blushing
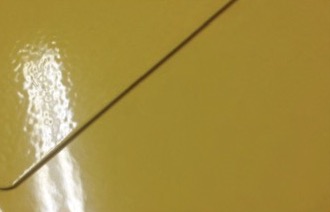
 Blushing (sometimes also called telegraphing) is when a substance pulls through the coating from the substrate, discoloring the finish. You’ll probably notice that you’ll have one spot where it’s perfectly fine, and then you’ll have another area that you’ll see this blushing or telegraphing. These marred sections can be large, small, and in between. This is caused by a number of factors, the most common being an improper pretreat. Anything on the surface, from the ink of a marker to the residue left behind from stickers and stamps, can telegraph through the coating. Another factor that can cause blushing is aluminum oxidation. If your coating is light in color, these marks will show through starkly, and the coating won’t be the only thing blushing then.
The key to preventing blushing is to keep a close eye on your pretreatment process. If you are working on an aluminum substrate, you need to sand the oxidization away, and if there are any marks (like writing) still on any substrate after a pretreat you will need to go in and grind it down – plus another pretreat to prepare the newly bared surface. However, if your pretreat system uses zirconium, don’t go bonkers with it. Otherwise, you may end up with flash rust, which can cause blushing as well.
Picture Framing
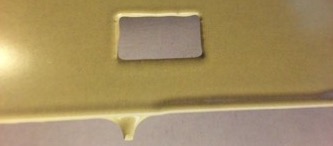
 Picture framing usually occurs around the outer edge of a part or an opening on a part. This results in a thicker film build around the edges, which is where the namesake of this appearance issue comes from – as, in the end, it looks like a picture frame. What causes picture framing is when too much powder is applied to the edges of a substrate and you almost get an orange peel effect. At times, like with translucents, you can also get changes in texture.
What causes these nasty defects though? Well, sometimes you have too much flow. Other times, you are building too much film on the substrate and it is pulling away at the edges. These are the two main reasons why picture framing occurs, and you can prevent it by paying particular attention to the gun and spray dispersal during the application process. If you are spraying by hand, try not to aim directly at the edges and let the racks take care of the edges for you. Also, watch your flow. Adjust the settings on your gun to reduce powder flow, and consider lowering your KVs.
If your job shop coats very large orders or has a big returning customer, then another thing to consider is building a dedicated rack that has a rod – basically, a raw bridge to keep the powder from building up too much in the corners. Adding a rubber bar around the rack can also help with reducing the number of rejects due to picture framing. This often described as a ‘rob bar’ is used as a means to help with this defect.
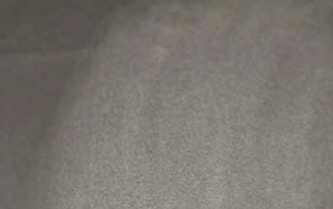
Outgassing
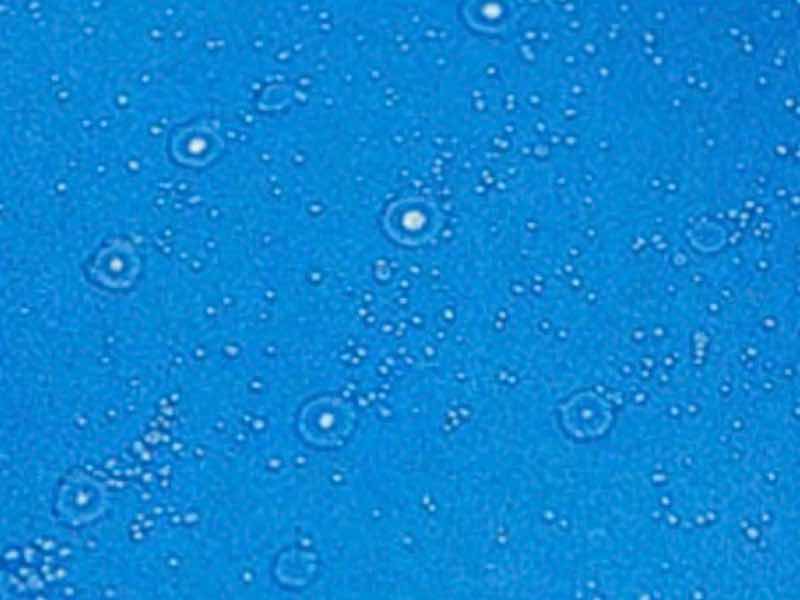
 This can be a thorny problem in any job shops side, as a coating with outgassing is terribly easy to spot. What happens is, during the curing process, little pockets of moisture or contaminants rupture on the surface of the substrate and work their way through the baking coating. A lot of the time, outgassing occurs when the substrate you are coating is cast steel or cast aluminum, as they contain tiny pockets of moisture. During the bake, those pockets literally rupture and outgas. The result is...well, visualize a geyser blowing, albeit on a smaller scale. Like little volcanoes on the surface of the powder coating.
As you can imagine, outgassing makes a mess of a coating.
The main reason behind why this problem happens is something is happening with the surface of the substrate before coating – most commonly porosity below the surface of the substrate or oxidation on the surface. We all know that oxidation can kick off a whole plethora of issues. If you are working with hot dip galvanized or aluminum and it is left lying around or outside, it can easily begin to oxidize. This will result in outgassing if the oxidation is not removed before coating. How to deal with all this nonsense though?
One option is to put the part in the oven before applying any coating. Half an hour, at 450 degrees – or just hotter than the curing temperature, in the oven will cause the substrate to outgas. Doing this pre-emptively to applying a coating is the best and simplest way to prevent outgassing from destroying a finish. Or, you can add a formulation into your primer or powder that is outgas-forgiving. Both IFS Coatings and our sister brand, Polychem, make OGF powders to help circumvent outgassing.
As a last tip for outgassing...if your job shop uses hot dip galvanized and the substrate forms white rust, then you need to mechanically or chemically remove it. Otherwise, you will get outgassing. It is truly a bear to fix, so preemptive measures are your best bet.
Fisheyes and Craters
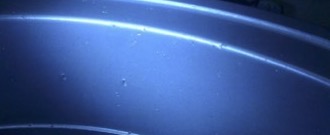
 Fisheyes are, essentially, the more severe version of craters. Whereas craters will look like small dips in the coating with a thin film still covering the substrate, fisheyes go all the way down – the coating has moved away entirely, leaving the substrate bared. Needless to say, it’s a very unattractive outcome.
A fair amount of the time, fisheyes are caused by contaminants like oil, silicone, or water; either in the powder itself, on the substrate, or contaminating both during application. Oil and silicone are particularly notorious for causing fisheyes. Now, some powders can handle contaminants better than others, so keep that in mind if you are looking to re-supply. Take care when applying high flow resins as they are more susceptible to developing fisheyes and craters.
Compatibility testing should be done before applying powder coating over any surface previously coated with anything other than powder. Some aerosol spray paints contain silicone, which will cause fisheyes and craters in powder applied over them. Additionally, fibers from grinding discs, adhesive from sandpaper, and secondary operations, like buckshot preventers, can cause craters and fisheyes.
How to solve this problem though? Clean and well-maintained equipment is key. A good, clean, filtered air supply is key. Inspect your air lines and ensure the air is clean and dry. You can also check the filters and drain or install traps. Oil may also be one of the contaminants so check the oil absorption unit for excessive signs of oil.
Make sure the gun, hopper and spray booth are completely cleaned and that the powder was stored correctly. In doing this you will be checking for and eliminating incompatible materials throughout the process e.g. silicones and lubricants;
Make sure you clean the guns, hoses, and hoppers thoroughly after each color change to eliminate cross contamination of different coatings and ensure the parts are completely dry before entering the spray booth.
Poor Color and Opacity
 The name speaks for itself, really. Either the color has shifted from what it should look like, or the pigmentation is uneven on the coating. There are a few factors that cause these issues. Overbaking is a big one – if overbaked, white pigments, pale colors, warm colors and clears can darken and yellow. Another factor is when the supplier itself is trying to cut costs by removing a portion of the pigmentation from the powder – such as creating an unnatural white pigment by replacing a percentage of the titanium dioxide with calcium carbonate, which is a filler. If this is a new problem with a product you’ve ordered before, or you’ve asked for some value engineering to be done to the product talk to your powder supplier about any changes that may have been made. Sometimes, it really just does come down to what product you are using, not how you are using it.
Asides from sticking with reputable brands and checking the listed materials and percentages on the products you use, you can solve this appearance issue easily enough. Be mindful of your film thickness, and follow the Technical Data Sheets instructions to the letter. If the TDS states a 400 degrees’ peak metal temperature for 10 minutes, make sure the part is at 400 degrees for the required time, not just the air temperature. The time in the oven is also important - leaving it in for 30 minutes will cause visible issues and leaving it in less will cause functional issues.
One more thing that you can do, which is really helpful in any scenario, is have sample panels that you and the customer can see beforehand. Try different film thicknesses on different colored substrates – using a yellow on a dark substrate will be different than using yellow on a light substrate – and, most importantly, show the customer what the end result will look like.
Poor Flow and Orange Peel
 Ah, orange peel. A terrible, annoying foe to any job shop. You know what it looks like, so we’ll jump right into what causes it. If you build the film up too thick, you will get orange peel. If you have poor ground, you will get orange peel. If you have the gun too close to the substrate causing it to kV reject, you will get, you guessed it, orange peel. Lay another coat over a mild orange peel and you will just make everything worse.
To avoid this nastiness, just follow these steps: keep your film even and in line with the TDS, mind your gun-to-surface distance, have good ground, and control your kVs and micro amps. Pay attention to the settings on your gun too. You may, or may not be surprised by just how many things can affect an application.
Sags
 This particular problem is not overly common in powder coatings; mostly, it is an issue with liquid paints. But, it can still crop up from time to time with powders, especially when the film build is excessively thick, or the formula of the product itself has too much flow. Sags occur in the oven, when the powder goes through the flow and gel stages, without the oven being the correct temperature, the film starts to move. Literally, the product sags.
Also, if the part itself if too hot when powder is applied, sagging can happen. So, to get around this issue, the best thing you can do is mind the temperature of the substrate and oven. Sags are ugly problems and are not easy to fix. Refer to your TDS or call your supplier if you are ever unsure about a product or having issues with it.
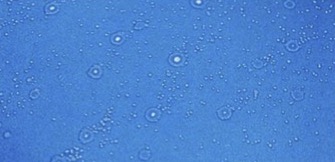
Pinholing
 Pinholing looks similar to outgassing, only on a smaller scale – with tiny, almost microscopic indentations on the coating. Depending on how bad the pinholing is, it can even evolve to looking like a large crater.
Often, what causes pinholing is when incompatible products are used together. Basically, they act as contaminants to one and other, and it shows. For example, if you run a super durable and throw a polyester in behind it, and they are not designed to work together, you can see a fine pinholing and gloss reduction after curing.
You can avoid pinholing by keeping your equipment clean, including hoses, hoppers, and guns. Having dedicated equipment for different colors and products is a good idea too. Also, in some cases, if the pinholing is showing up in the oven, you can crank the temperature up and cure out the contaminants.
Gloss
 Inconsistencies in gloss are noticeable and irritating to see, as a gloss is often the final touch to a coating that brings pigments and metallics to luster. What causes a gloss coat to fail is often overbaking, causing the coat to dull in places, or even take on a yellow tinge. Other times, like pin holing, using incompatible products together will cause a reject. This can also be caused by using two different products on the same machine without cleaning it properly in between applications.
Keep your gloss, well, glossy by ensuring that you clean your equipment thoroughly and are using products designed to work together.
Film Thickness
Film Thickness Appearance Issues: When Powder Coating Jobs Go Wrong Pretty straightforward, this one. Typically, this is an application issue. Gun spits or surges can muck up the spraying process, resulting in uneven dispersals of powder. Avoid this by maintaining your equipment regularly, make sure hoses aren’t tangled or kinked, and be certain that you have good ground. Keep the racks clean and check that the hooks have good metal to metal contact. Finally, during the application itself, ensure the powder is fluidizing correctly and the gun is spraying an even and consistent layer.
To Wrap Up
In this guide, we have covered the many ways a job can go wrong in terms of appearance. Rejects are infuriating to deal with and often result in time and money being wasted. Knowing what problems occur, why they occur, and how to prevent them, are a few steps you can take to keeping your job shop in top shape. Most of the issues we spoke about in this guide can be circumvented by maintaining and cleaning your equipment persistently, minding the TDS guidelines, and using products formulated to work together.
Fiona Levin-Smith is Vice president of Marketing and Specification for IFS Coatings. For further questions or inquiries, visit www.ifscoatings.com