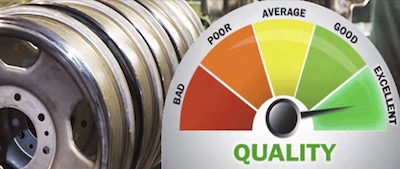
No matter what you’re powder coating, no matter the size of the line and no matter the type of powder or color you’re shooting, everyone wants to do a great coating job.
We all work hard to make sure our customers are satisfied and their powder coated product looks great and performs well. Quality Control Testing, or QC testing as its better known, is a simple way to ensure you’re powder coated film is going to do just that – perform well. And the good news? It’s simple, cheap and easy to do.
 Fiona Levin-SmithYou know how it goes. You’re only shooting the color once and it has to match the standard the coating company supplied - that’s what your customer wants. Of course as well as looking great, we also want some basic performance from that coating too. Performing some simple QC tests will ensure that the powder is going to adhere, protect, decorate and perform exactly as it should when it’s on the part. This gives you the confidence to be proud of a high quality and reliable service and leaves your customers with a happy experience that will make them want to work with you again.
There are a few simple QC tests that are easy and quick to perform so let’s take a look at some of those tests, why we need to do them and what we need to look for along the way.
Who Should QC Test?
 At IFS we understand quality. As manufacturers and suppliers of high-quality industrial powder coatings, our production facilities and internal quality control systems are designed with superior quality in mind and we use the most advanced technologies and experienced staff to QC test our powder at the IFS facilities.
We undertake QC before, during and at the end of the production of each product we manufacture. But, the QC testing doesn’t and shouldn’t stop there. Everyone – no matter what you’re shooting or the type of powder operation you have – can perform simple QC for peace of mind.
QC procedures can easily be continued by you to make sure that the product will perform as per the Technical Data Sheet (TDS) we provide for you. This ensures that the application is completed to the required level and that your customer will receive the high- quality coating job they ordered.
If you’re not familiar with the TDS here is some insight: at IFS Coatings, we produce a tech data sheet for each product we make. On that tech data sheet, you’ll find a description of the product, the typical physical properties you can expect the powder to provide if applied properly, such as gloss level, hardness, flexibility and adhesion, application tips, cure schedule and storage requirements.
The TDS gives you a basic level of performance – a quality spec – that the powder can achieve if applied properly. They provide a lot of useful information to you, but you shouldn’t always assume the powder will meet the spec - applying it correctly is a big part of achieving that performance. Here are some of the simple tests that can be performed and what to watch out for.
So we now we know who should be QC testing and of we know why we do it, but what should be testing for and how? Let us explain.
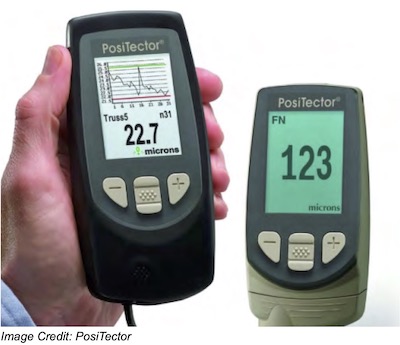
Film Thickness Testing: The Film Thickness Meter
 Film thickness – and a constant, level thickness at that – is important. It affects how the coating looks (no one wants a patchy effect) but also overall performance.
The simple way to check film thickness is with a Film Thickness Meter or Gauge. Best used on a flat surface, they’re easy to use. With most meters, you press it to the surface, hold it there a few seconds and get a reading. The reading will tell you what the film thickness at that specific place is. You should repeat the test in several places across the part. It’s going to vary, (hopefully only slightly, so you should perform the test in several places to get an average and be sure you’re in the required film thickness range.
There are a range of meters available. The latest and greatest can produce the film thickness grade information as soon as a surface is touched, others take a little longer and many are magnetic.
Knowing your substrate is also important. The meters can measure coating on aluminum or steel but be sure that yours can test for both as certain gauges won’t measure aluminum.
Why is this important? Well, most gauges are based on the magnetics of steel or the rebound of the signal from steel. Obviously aluminum doesn’t react the same way, so a different type of gauge or a combo gauge will need to be used if you’re going to be measuring both substrates.
As with most things in life, you can spend as much or as a little, as you like for a film thickness meter. You can certainly find a cheaper film thickness meter around the $100 mark. The little magnetic ones and the low film mils from one to three mills, are pretty accurate and can certainly do the job. That’s pretty inexpensive and may be all you need. A middle of the range, high quality, good working gauge that you can calibrate and zero out for bare metal can range from $400-$800. Of course, if you want to go all out you can also spend $2,000!
Film Thickness Testing - What Makes It Fail?
The thing to remember is that Film thickness, of course, is a range. Failure, therefore, would be in a case where there would be too little or too much, or too much variation. Too little is poor appearance, incomplete coverage of the substrate and failure of other tests such as corrosion and color. On the other end of the scale, too much can lead to poor appearance and failure of other tests such as impact and flexibility.
Solving film thickness:
| Problem | Possible Cause | Solution | ||
| Uneven film thickness | Distance between gun and part is too close | Distance between gun and part is too close | ||
| Uneven film thickness | Powder is delivered inconsistently | Distance between gun and part is too close | ||
| Uneven film thickness | Irregular voltage | Check the entire system (from voltage source to electrode) to ensure continuous electrical charge |
The Solvent Rub Test
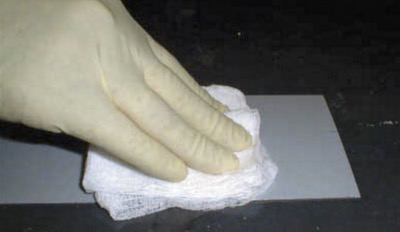 How about another example? Let’s take a solvent rub test. This test method is used to measure the degree of cure of a coating. Making sure your coating is fully cured is super important – it simply won’t perform if it’s not! It’s done by checking the degree of resistance the cured film demonstrates to a solvent.
The two main solvents used in the rub test are acetone and more commonly, methyl ethyl ketone (MEK), which is what most coaters use. The MEK test is an ASTM standard. The test requires you to take a Q-Tip or a cotton swab and then wet that swab with acetone or MEK before firmly pushing on the product surface and rubbing back and forth. In general, 25 double rubs are performed. Pressing all the way up and all the way down is classed as one double rub. The number of rubs that a coating will pass will vary between product type or the resin system used in it. Some products, like epoxies, will handle 50 double rubs.
When you finish your 25 double rubs there is a chance that you will see some slight de-glossing of the coating. Most of the time a little bit of de-glossing of the coating is still a pass.
However, what we would really call a fail is when you really start to get down into that coating and the coating is removing onto your Q-Tips.
A little bit of color on the end of the Q-Tip is okay, but if you really feel like the coat is softened and it’s coming away and your Q-Tip is covered, you’ve got a problem. It’s not cured properly.
There is one little caveat to the test, however. There are certain resin systems that from past experience don’t do as well with the solvent resistance test whether they are fully cured or not. It’s something our technical service reps have seen a number of times. A solvent rub test would fail miserably and of course, we assume the coating is not cured.
However, they then discovered that the resin itself doesn’t perform in the solvent test, cured or uncured. It’s always best to check with your manufacturer if you’re testing a new product with a different resin system.
So what should you do if the test does fail? Recheck your oven temperature and dwell time. Did the part have time to reach temperature and THEN spend the required amount of time in the oven? We know what the air temperature is in the oven, but the part won’t instantly be at temperature the moment it goes in – especially with thicker parts. You may be able to put the part back in the oven and ‘top up’ the cure, or you may need to recoat and re-cure. You can always check with IFS for technical advice if you’re having recurring problems.
Solvent Rub Checks - What Makes a Fail?
Additionally, If you looked at the results of your solvent rub test and you’re seeing a fail, there could be several different reasons, but the most common are typically going to be the temperature and/or the time of which the powder was cured.
Check the tech data sheet - it’s going to give you the oven temperature needed to cure the coating and the amount of time it needs in the oven. For example, if a powder was applied and then failed a QC test, you may want to go back and turn the oven temperature up another 10 or 15 degrees to see if that resolves the problem. Alternatively, it may be that it did not spend enough time in the oven. Or, as previously mentioned, perhaps the part had not been given the time to reach temperature, as it’s only when the part reaches temperature, that the cure time begins.
What’s more, you may encounter the issue of having different thicknesses of metals. Of course, the thicker the metal, the longer it’s going to take to come up to temperature and for that temperature to hold to get a full cure.
So, If you do have a failure, start looking in your oven. Am I leaving it in there long enough? Is the temperature high enough? Have I performed oven maintenance so I know it’s performing as required?
Experience
A note regarding the above points is that a lot of that solvent testing comes back to experience. There are things that you may let go with a little transfer, there are other things you won’t let go with a little transfer without knowing the full background of what the product will or won’t do. It’s a general test and over time you will get to know what is working and what isn’t.
The Pencil Hardness Test
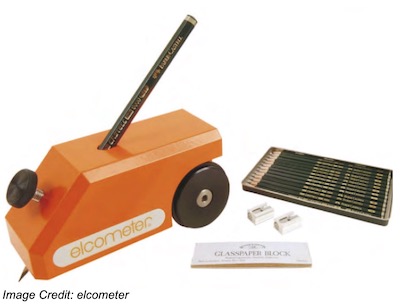 Once you’ve established good cure, the ‘pencil hardness test’ is an effective method to test coatings for their hardness and their scratch wear resistance. ASTM test method D 3363 allows the use of pencils of known hardness to be moved over the surface of the test sample at a fixed angle and pressure to perform the test.
As you may well be aware, pencils come in a hardness range with a ‘B’ pencil being the softest category and ‘H’ pencils being the hardest. Within each category, there is also a numerical domination, such as 2H or 6H, which indicates hardness within that category. As the numbers increase so does the hardness, so 4H is harder than an H pencil.
With good quality powder coatings, you’ll usually end up in the H range. So, if the TDS or your customer requires a 2H pencil hardness, then that’s the pencil that should be used,
To complete the test, you simply sharpen your pencil, then create a flat end with a piece of sandpaper and place it at a 45-degree angle to the coated surface. Press it down into the coating and then push. If that pencil cuts down to the metal, then it failed that test. If there is no scratch on the paint, then it is considered a pass.
This is a simple and cheap test that is easily performed to demonstrate the quality of your application and there are a few things to consider...
Get yourself a good set of pencils and remember that old pencils, junk pencils, or not a name brand will get you different results all day long. If you’re going to use a pencil test, we recommend you buy a decent turquoise brand pencil and for consistency, always use them. You can buy them at most art stores and they are available in the full hardness range. Think about testing an additionally coated piece till it fails – you may find that the hardness rating you can offer goes beyond what is required – a great selling point for you.
Also, remember that each person and pencil may get a different result because of the manual nature of the process. Being consistent with the pencils you are using and the pressure that you apply will ensure fair results. Regularly performing the test will help you get to know your own scales and strengths.
Pencil Hardness Testing - What Makes It Fail?
A pencil test will most likely fail as a result of two things... Under cure or over cure. So again, be sure to look at the tech data sheet for the guidance on the correct curing details.
Crosshatch Adhesion Test
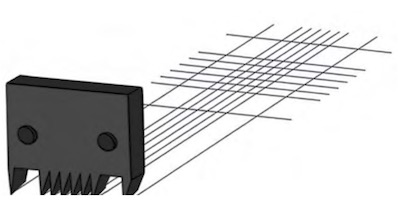 The Cross Hatch Adhesion Test is a very popular test to assess the adhesion of the coating and essentially provides a visual assessment of the quality of the bond to the substrate.
The test is performed by making a series of cuts through the coating (There are kits available for this as it is important that you use the preferred blade devices for each film). Generally, 5 cuts are made with 5 sharp blades reasonably close together in one direction.
Then cut across that direction so you’ve cut through the paint to the metal five times left and right, and five times up and down. It should look like a tic-tac-toe grid when you’re done.
Once you have your tic-tac-toe grid, the pressure sensitive adhesive tape is applied to that area, pressed down real good and then the tape is removed. That area is then judged to see if any paint was removed from the cross-sections that were cut. No coating removal is a good pass. If there is a little corner here or there that has been pulled off it would likely still be ok and would pass the test.
To determine this, there is an ASTM rating scale to make the decision - a 5B result is usually the sweet spot.
The best way to make sure that you have been doing the test correctly is to get an official cross hatch adhesion test kit and maintain it. That way you are guaranteed quality and accurate test results each and every time. Kits cost between $30-$100.
Remember this is a simple, fast and cheap test to perform, and we highly recommend you get hold of a solid adhesion testing kit and make it part of your QC process.
Crosshatch Adhesion - What Makes It Fail?
What makes the coating fail a crosshatch adhesion test? Well, you’ve really only got two possible scenarios. One, you could have a bad pre-treatment or a poor substrate where the substrate is not clean enough or has not been correctly prepared, which leads to adhesion failures.
Checking your pretreatment process, the quality and cleanliness of the substrate should be your first port of call. The second reason for a testing fail could be if the paint is under cured. Check out the simple ways to check for that we covered in the Solvent rub testing section.
Visual Checks
 So far we have covered QC tests that require some hands-on tools and physical movement but we can also learn a lot from simple visual checks. Yes, it sounds pretty obvious and super simple but there are still a number of things to consider when completing visual checks. Where should you look at it? On the floor? Outside? Inside? Here are some points to take note of.
It’s important that your visual tests are consistent with how your customer will check and use the coated product. If your customer is going to look at the product in one light then you should test it in the same light.
If you want more of a controlled testing system than going outside or inside, many job shops use light boxes to control the light. This is more of an investment, as light boxes range in cost but they will provide consistent results. The other element to the lighting is the distance from which you are viewing the surface, especially when checking for any type of surface defects. You will get a different result if you look at a 90-degree angle at arm’s length than from a 45-degree angle closer up. Our advice would be to do the visual test with lighting in an office-type setting, out on the shop floor and outside in the daylight too – cover all bases.
Mica metallics, for example, can look like a different color in the light or the dark which can produce conflicting opinions on the color, so it is essential that all parties are aligned and that the test measurements and conditions are clearly stipulated.
Of course, you could be opening a can of worms if there are too many variables at play but visual tests are what your customer will instantly do when they receive the coated part, so agreeing what it should look like up front is important.
Visual Checks - What Makes a Fail?
Visually you could see all manner of defects in the paint – craters, orange peel, window framing...the list goes on. Each of those can be a result of a change or problem in the application process, and we cover in our . Right now, let’s deal with the basics – color and gloss.
Depending on the color being used, the results may vary slightly, generally speaking, if it darkens or yellows and you see some de-glossing, there’s a good chance the coating is over-cured. If it is lighter than it should be or bluer in shade and your gloss is too high, there is a good chance the coating is under cured.
If you’re seeing yellowing to the color it could be due to a film thickness variation, or that the coating is over cured or could even be caused by oven exhaust. Problematic, but all easy to check and solve.
Summary
These are just a handful of Quality Control tests that are cheap, easy and simple to perform. You can and should be implementing them regularly to ensure high-quality processes, products, and happy customers. At the end of the day, they will give you peace of mind that the coated parts going out of your door are acceptable.
You may not want to do them all or may feel that not all are applicable to every part you coat, but the solvent rub test and cross hatch adhesion test are a basic minimum which will give you great results. Of course, on a visual level you will want to see that the color and gloss is right, if not, we all know the customer will be the first one to complain! Keep your reputation as a first class coater in check by visually inspecting each job that leaves your shop.
Fortunately, there isn’t anything hard about any of the tests above. They are simple and relatively cheap to perform. As with most things, however, consistency is key. Make sure you, your customers and your colleagues or employees are testing in the same way; in the same light, at the same angle, with the same pencils, kits, and meters etc. And remember that experience will count for a lot over time, so the more you test, the more comfortably and quickly you will be able to make a decision on how to pass or solve any questionable results.
Fiona Levin-Smith is Vice President of Marketing and Specification for IFS Coatings. For further questions or inquiries, visit www.ifscoatings.com