In this study, we used the depth-sensing indentation technique to determine the cracking resistance of different PVD hard coatings deposited on tool steel substrates.
 From top left, Peter Panjan, Aleksandar Miletić, Aljaž Drnovšek, Pal Terek, Miha Čekada, Lazar Kovačević and Matjaž Panjan.By comparison, with the load–displacement curves, measured at the sites of carbide inclusion and a tempered martensite matrix in the D2 tool steel substrate surface, we observed different fracture mechanisms on TiAlN hard coating prepared by sputtering. Additional information about the deformation and fracture phenomena was obtained from the SEM images of FIB cross-sections of both types of indents.
We found that the main deformation mechanism in the coating is the shear sliding along the columnar boundaries, which causes the formation of steps on the substrate surface under individual columns. Using nanoindentation test, we also analyzed the cracking resistance of a set of nl-(Cr,Al)N nanolayer coatings with different Cr/Al atomic ratios, which were sputter deposited in a single batch. From the indentation curves, we determined the loads (Fc) at which the first pop-in appears and compared them with the plasticity index H3/E2.
A good correlation of both parameters was found. We also compared the indentation curves of the TiAlN coating, which were prepared by cathodic arc evaporation using 1-fold, 2-fold and 3-fold rotation of the substrates.
Additionally, on the same set of samples, the fracture toughness measurements were performed by micro-cantilever deflection test. The impact of growth defects on the cracking resistance of the hard coatings was also confirmed.
1. Introduction
PVD hard coatings are usually deposited on softer tool steel materials. Under the influence of external load during operation, the coated substrate can elastically and plastically deform. In order to maintain the integrity of the coated tool, the hard coating must have sufficient elasticity and cracking resistance. In industrial applications, the toughness of PVD hard coatings is just as crucial as its hardness, oxidation resistance and adhesion to the tool surface [1,2]. All of these properties significantly impact the wear resistance of the tools. Degradation and fracture failures of the coated tool during machining most often start with cracking of the relatively brittle hard coating. High fracture resistance of hard coatings is especially important in interruptive machining, such as milling, where the formation of cracks is caused by high tensile stresses at the cutting edge. High fracture resistance is also important in other machining and forming operations of materials, e.g., plastic deformation processing where impact load occurs.
Toughness describes the ability of a material to absorb energy during deformation until it fractures at a certain load [3]. On the formation of cracks, the elastic energy accumulated in the coating during the deformation process decreases. A smaller part of this energy is dissipated also as heat and acoustic emission. Hard coatings exhibit numerous deformation and crack-formation mechanisms. In general, the hard coatings might deform elastically, plastically or by formation of cracks, depending on the applied contact load. In order to estimate the performance of coated tools in an industrial application, it is important to know which damage modes of the coating can be activated during deformation. However, which mechanism will be active depends not only on the hard coating properties (thickness, residual stresses, microstructure, coating architecture), but also on the properties of the substrate materials, the geometry of the contact and the magnitude of the load. In general, hard coatings with amorphous microstructure exhibit better toughness compared to polycrystalline ones, because grain boundaries in crystalline coatings enable a faster propagation of cracks [4].
To enhance the toughness of hard coatings, different approaches can be used. In general, the toughness can be improved if crack initiation and propagation are reduced. One can achieve this by incorporation of alloying elements in the interstitial or substitutional sites of the coating crystal structure. Another approach is the preparation of the hard coating in the form of a nanolayer or nanocomposite structure [2]. While in the single-layer coatings, the cracks propagate along the column boundaries straight down to the substrate, where they terminate, the interfaces between individual layers in a nanolayer structure or boundaries of nanocrystalline grains hinder the formation and propagation of such cracks. At each interface, the cracking process must start all over again, which requires more energy for crack propagation than in single-layer coatings [5]. The changes in microstructure by the deposition of different phases also have an influence on the crack resistance. Daniel et al. have shown that the crack propagation can be controlled by sophisticated grain design [6]. In the case of interruptive machining (e.g., milling), the formation of cracks at the cutting edge can be suppressed to a large extent by the introduction of high compressive stress in the hard coating which compensates for the friction-induced tensile stresses. However, optimal compressive stress must be achieved to avoid coating delamination when coating thickness increases. Several investigations have reported an increase in fatigue strength of the PVD coated steel substrates under cyclic bending load [7,8,9]. This phenomenon could be related to the compressive residual stresses in the coating that delay the initiation and propagation of surface or subsurface fatigue cracks. However, in some cases, the hard coating also has a detrimental effect on the fatigue properties of the substrate (e.g., WC-Co hard coating on pure titanium) [10].
Although crack resistance is a very important property of PVD hard coatings, not much investigation has been devoted to this topic so far. In the literature, several techniques have been proposed. One of the methods used to measure toughness is the bending test [11], carried out by a bending device built in a scanning electron microscope (SEM). The method is based on counting the number of cracks per unit length that occur in a coating subjected to a wide range of applied loads. In the plot of crack density vs. applied load, the measure of the coating cracking resistance is the load at which the first cracks appear. Different substrate–coating systems respond to bending differently. The bending test method can be significantly improved by simultaneously measuring the acoustic emission during the bending process. Namely, such emission strongly increases when the first cracks are formed in the coating.
The scratch test, most widely used in evaluating the adhesion strength of hard coatings, can also be used in evaluating the crack resistance. In this test, the load of the diamond stylus at which the first microcrack appears in the scratch track is termed the “lower critical load” or “scratch toughness”. Some researchers use this load as a measure of crack resistance. However, Zhang et al. found that the coating toughness should be proportional to both the critical load at which the first cracks occurs, as well as the load at complete delamination of the coating [12].
The most commonly used method for evaluation of the hard coating toughness is the indentation test. In this method, the deformation behavior of hard coatings is examined by making an indent using a sharp prism, such as Berkovich or Vickers. During penetration of the indenter tip, a hard coating is stretched and flexed, namely, the indenter tip pushed the coating into the softer subsstrate. Most deformation energy accumulates in the vicinity of the indenter tip. This results in high compressive stresses directly beneath the indenter. When the load (F) exceeds a certain value, these stresses relax by the formation of cracks. However, the largest number of cracks is caused by tensile stresses in different zones around the indenter tip. All cracks initiate at different sites in the deformed region of the coating and propagate in different directions (see Figure 1). They can be formed on the coating surface or inside it and they propagate both parallel and perpendicular to the surface. In general, indentation fracture modes in PVD hard coatings with columnar microstructure consist of radial cracks, cracks along inter-columnar boundaries (shear cracks), trans-columnar cracks (inclined, lateral, edge and bending cracks) and cracks from the interface [13,14,15,16,17].
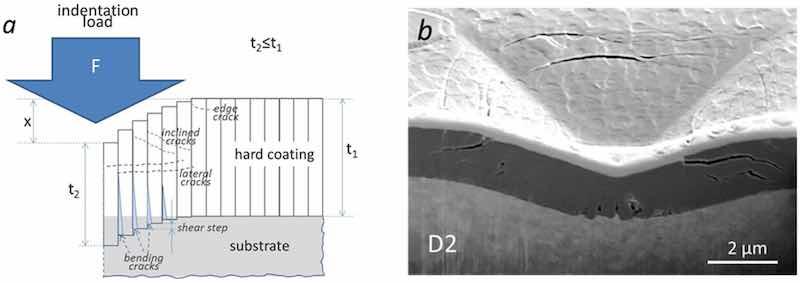
Figure 1. (a) Schematic diagram of fracture modes in a PVD hard coating with columnar microstructure deposited on softer tool steel substrate; (b) SEM image of FIB cross-section of a 1000 mN Vickers indent in a TiAlSiN hard coating sputter deposited on D2 tool steel substrate.
The radial cracks appear on the coating surface at the corner of the indent, where the maximum tensile stress prevailed during the indentation test, and then they propagate downwards. Edge cracks (or circumferential cracks), clearly visible from the top view images, appear at the free surface outside the indenter contact area and they are parallel to the edge of the indenter. They do not spread through the entire coating thickness, while their propagation direction often deviates from the indenter axis direction. The other types of cracks are bending cracks that originate in the coating–substrate interface and propagate up the columnar boundaries until they reach the surface compressive zone. They appear most intensively in the axis of the indenter. The lateral cracks that initiate below the indent run parallel to the coating surface. These cracks are formed during the unloading phase as a result of the release of elastic strain energy stored during bending. The trans-granular inclined cracks propagate at an angle to the indentation axis towards the coating–substrate interface and tend to curve away from the substrate near the interface. They do not extend up to the coating surface. The inclined cracks, lateral cracks and bending cracks are a result of strain incompatibility between the coating and the substrate. Their formation is driven by a mismatch of the stress field and not by the microstructure. The shearing (sliding) cracks are formed along columnar boundaries in a zone of high compressive stress. This fracture mode does not create open cracks.
The formation and propagation of all these cracks appear as discontinuity (steps, pop-ins) in the displacement–load (x-F) curve of the indentation test. The magnitude of these steps is related to the total mechanical work dissipated in individual fracture events, while their number increases with the indenter penetration depth (x). However, we must be aware that in some cases the occurrence of pop-ins can also be related to other phenomena, such as coating delamination or chipping, dislocation nucleation, surface roughness and phase transformation [18]. The appearance of cracks can also be related to a sudden change in the slope of the indentation curve [19]. In any case, the indentation curve is a kind of micromechanical “fingerprint” of the substrate–coating system. For interpretation of the indentation tests, the finite element method (FEM) is very often used [20]. This way, a simulation of the stress–strain state in the deformed region under the indenter tip is possible.
In the last decade, significant progress in understanding the deformation behavior of coatings has been made in micromechanical testing [21,22]. The free-standing pre-notched coating micro-cantilever is prepared by removal of the substrate material by a focused ion beam (FIB) unit, built in the scanning electron microscope. After that, inside the SEM microscope the cantilever is loaded by pico-indenter until fracture and the representative force–deflection curve is measured. Instead of nanoindentation on a cantilever bending, Sebastiani et al. proposed the test on micropillars with a specific geometry [23,24]. Such nanoindentation results in the micropillar fracture by splitting at a certain load. This critical load can be quantified from pop-in events in the indentation curve. FIB machining can also be used to fabricate the specimen for micro-tensile testing of coating in the form of a dog bone attached to the substrate [25,26]. Using the same technique, a micro-gripper, which must perfectly match with the geometry of the specimen, is fabricated in the silicon probe. In the SEM microscope, the gripper clamps onto the test specimen and then is subjected to tensile stress until it fractures at a certain load. The applications of both micromechanical testing techniques are limited to coating materials where no ion damage can be expected.
Ten years ago, an energy-based technique named the internal energy-induced cracking (IEIC) method was also proposed [27]. In this method of fracture toughness measurement, the intrinsic residual stress in the hard coatings is used instead the external stress. This can be achieved by continuous deposition of hard coating until reaching the thickness at which the coating is fractured due to residual stresses.
In this work, we studied the fracture mechanisms of different hard coatings deposited by magnetron sputtering and cathodic arc evaporation using the depth-sensing indentation test in combination with SEM imaging of the indent FIB cross-sections.
2. Materials and Methods
2.1. Coating Preparation
TiAlN coatings were produced in the industrial magnetron sputtering unit CC800/7 (CemeCon, Wurselen, Germany) using four rectangular mosaic Ti-Al targets at 8 kW each. All others coatings (TiAlSiN, TiAlN/VN, nl-(Cr,Al)N) were deposited in the CC800/9 sputtering system (CemeCon, Wurselen, Germany). Both sputtering units CC800/7 and CC800/9 are equipped with four unbalanced magnetrons which are connected to DC power supplies. The size of the targets was 88 × 200 mm2 and 88 × 500 mm2 for CC800/7 and CC800/9 sputtering systems, respectively. The magnetron sources are placed in the corners of the vacuum chamber. For deposition of the nl-(Cr,Al)N nanolayer coatings, we used the following target configuration: one chromium, one aluminum and two segmented Cr/Al targets consisting of one Cr and one Al triangular piece (positioned at the opposite sides of the chamber). In such a way, nanolayer coatings with different Cr/Al atomic ratios were prepared in one single batch. Argon, krypton and nitrogen (N2) were used as carrier gas and reactive gas, respectively. One set of TiAlN coatings were also prepared by cathodic arc evaporation in the AIPocket unit (KCS Europe GmbH, Monschau, Germany). The deposition processes, performed in these three deposition systems, have been described in more detail elsewhere [28,29,30].
Disks made of cold work tool steel AISI D2 (hardness around 58 HRC, Ravne steel factory, Ravne, Slovenia), hot working steel AISI H11 (48 HRC, Ravne steel factory, Ravne, Slovenia) and powder metallurgical tool steel ASP30 (65 HRC, AISI M3:2+Co, Uddeholm, Hagfos, Sweden) were used as substrates in this study. The chemical composition of tool steel substrates is given in Table 1. Tool steel substrates were used in the quenched and tempered state. All substrates were first ground and polished to a mirror finish. Before deposition, they were cleaned in an ultrasonic bath, rinsed in deionized water and dried in a hot air. During deposition the substrates were mounted on the planetary substrate holding system using 1-fold, 2-fold and 3-fold rotations.
Table 1. Chemical composition of D2, H11 and ASP30 tool steel substrates (wt.%).
| C | Si | Mn | Cr | Mo | V | W | Co | Fe | |
| D2 | 1.53 | 0.35 | 0.4 | 12 | 1 | 0.85 | / | / | 83.87 |
| H11 | 0.37 | 1 | 0.38 | 5.15 | 1.3 | 0.4 | / | / | 91.4 |
| ASP30 | 1.28 | / | / | 4.2 | 5 | 3.1 | 6.4 | 8.5 | 71.52 |
2.2. Coating Characterization
The chemical composition of the as-deposited coatings was measured by energy dispersive X-ray spectroscopy (EDX, Oxford Instruments, Abingdon, UK) attached to a scanning electron microscope (SEM, JEOL JSM-7600F, Tokyo, Japan). The depth-sensing indentation experiments were conducted using a Fischerscope H100C tester (Helmut Fischer GmbH, Sindelfinger, Germany) equipped with a Vickers diamond indenter. The parameters of the indentation test were as follows: load range 0.4–1000 mN, load resolution of 0.2 mN, indenter shift resolution 2 nm and a stepwise increment of load. Load–displacement curves were analyzed to evaluate the cracking resistance of coatings. After the indentation test, cross-sections and SEM imaging of Vickers indents were performed using Helios NanoLab 650 unit (FEI Company, Eindhoven, The Netherlands). The fracture toughness of TiAlN single-layer coatings prepared by cathodic arc evaporation was determined at room temperature by in situ scanning electron microscopy micro-cantilever deflection tests (FEI Quanta FIB using a Hysitron PI89 PicoIndenter, Bruker, Billerca, MA, USA). The micro-cantilevers were prepared using an FEI Helios Nanolab650 dual beam FIB system. Both the micro-cantilever deflection test and micro-cantilever preparation have been described in more detail elsewhere [22].
3. Results
3.1. Influence of Carbide Inclusions in D2 Tool Steel on the Nanoindentation Test
Cold-work tool steel D2 contains a high-volume fraction (10%–15%) of the coarse M7C3 chromium-molybenum carbides (1–20 µm), which are non-uniformly distributed in the tempered martensite matrix. After mechanical pretreatment (grinding, polishing) and cleaning by ion etching of such tool steel substrate, small protrusions (typically 50–100 nm in height) appeared at the sites of carbide inclusions [30]. After deposition of hard coating, the geometry of all these protrusions transferred to the coating surface. The contours of these carbides are clearly visible under an optical microscope built into the nanoindenter device. This phenomenon allowed us to perform nanoindentation tests on two separate places, namely on the carbide inclusion of larger dimensions (e.g., 15–20 µm) that is present under the coating, and in the area outside of it (Figure 2). This way, direct comparison of the coating mechanical properties at two neighboring substrate places, which differ significantly in the hardness and elastic modulus, is possible.
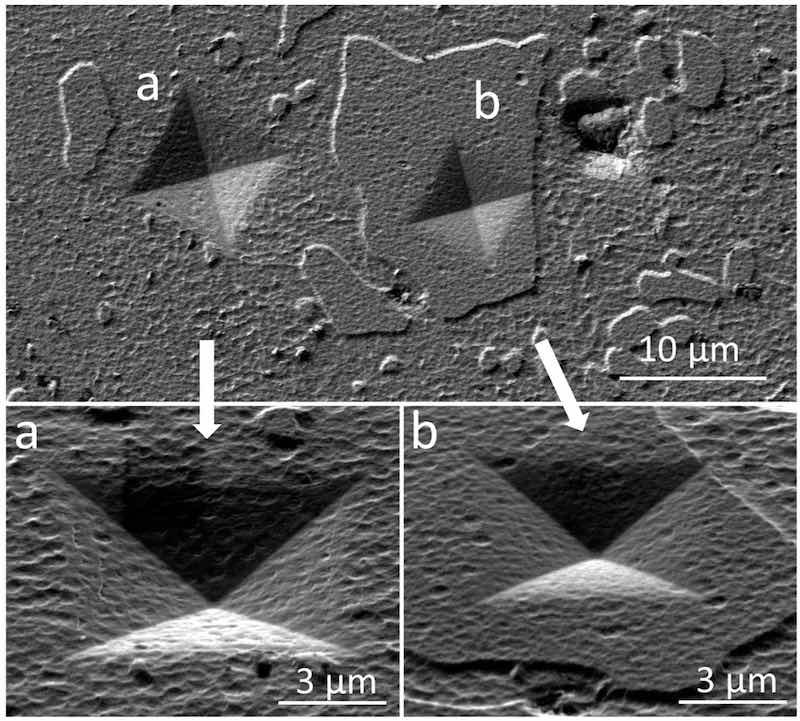
Figure 2. Top view SEM images of indents at 1000 mN load on TiAlN sputter-deposited hard coating (a) at the tempered martensite matrix and (b) at the site of a carbide inclusion. The bottom SEM images (a,b) were recorded from a side view at about 30° inclination.
The results of the indentation tests at the sites of the carbide inclusion and the tempered martensite matrix of D2 tool steel substrate are present in Figure 3a. The experiments show that the presence of the carbide inclusion under the coating reduces the indenter penetration depth considerably. Another difference concerns the steps (or pop-ins) that appear on the indentation curves. Such steps are often not very pronounced, and they are difficult to notice. A more accurate identification of these steps is obtained by plotting the first derivative of displacement with respect to load (dx/dF) as a function of the indentation load. Figure 3b shows such curves for the TiAlN coating deposited on the tempered martensite matrix as well as on the carbide inclusion. The essential difference between both indentation load–displacement (x-F) curves is that those obtained on the tempered martensite matrix show the first pop-in at a load of 200 ± 10 mN, while we observed no such steps on the curve belonging to carbide inclusions up to the 1000 mN load. This difference is due to the fact that the bending of the coating due to plastic deformation of the substrate is much larger at the site of the tempered martensite matrix than what occurs at the position of the carbide inclusion.
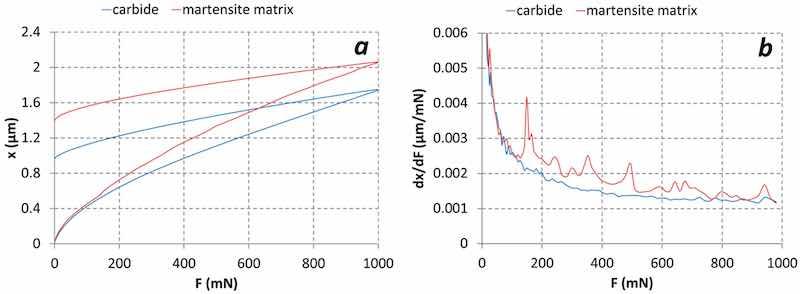
Figure 3. (a) Displacement–force curves for TiAlN coating deposited on carbide inclusion and tempered martensite matrix in D2 tool steel substrate. (b) First derivative of the displacement with respect to load (dx/dF) as a function of indentation load. In the case of the tempered martensite matrix, the first peak in the first derivative curve occurs at around 175 mN load.
Both kinds of indents were analyzed in more detail by making cross-sections through their center using FIB milling. From SEM images of such cross-sections, we can obtain some information about subsurface deformation and fracture modes (Figure 4). In general, during indentation test the PVD hard coatings might be deformed elastically, plastically or by formation of cracks. At lower indenter loads, plastic flow by dislocation movement dominates, while at larger ones cracking prevails [31]. Conventional sputter-deposited PVD TiAlN hard coatings are characterized by a columnar microstructure with columns aligned in a direction perpendicular to the substrate surface. The individual columns are composed of elongated crystal grains with different orientations. In coatings with such microstructure, the contact pressure of indenter tip transfers along the columns. The pressure is the highest in the indenter axis direction and gradually decreases towards the edge of the tip. Adjacent columns slipped past one another and they were “pushed” into the softer substrate material, thus plastically deforming it. As a result of such intercolumnar sliding process, shear steps formed on the substrate surface under individual columns.
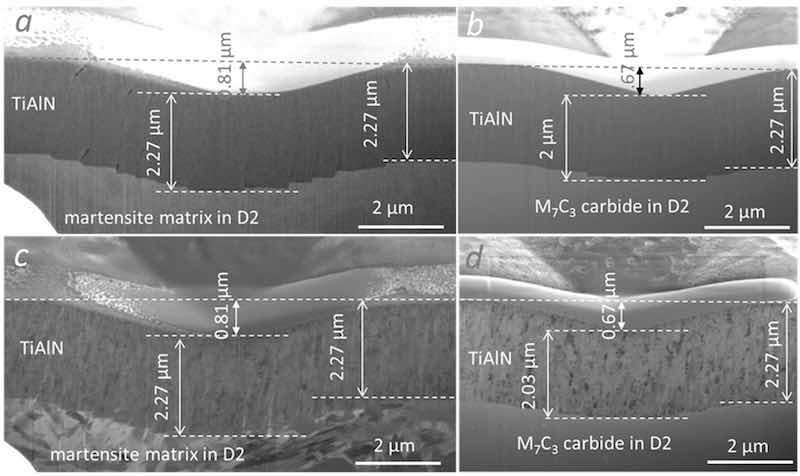
Figure 4. SEM images of FIB cross-section of 1000 mN Vickers indents displaying the shear steps and indentation fracture modes of the TiAlN hard coating deposited on D2 tool steel substrate. The two SEM images below (c,d) were recorded using the ion beam. The indentation impression was performed in the area of the tempered martensite matrix (a,c) and at the site of a large carbide inclusion (b,d) on the substrate surface. It is evident that the shear cracks and shear steps are much more intensive on the tempered martensite matrix in comparison with at site of the carbide inclusion.
The appearance of intercolumnar shear sliding and formation of shear steps at the substrate–coating interface during the nanoindentation test of nanolayer coating (TiAlN/VN, CrAlN/TiSiN) was already reported in our previous papers [32,33]. Figure 5 shows, for example, the cross-sectional ion beam image of an indent performed on the TiAlN/VN nanolayer coating sputter deposited on the ASP tool steel substrate. In the image, the steps formed under individual columns during the indentation test are clearly visible. The ion beam image also shows the microstructure of individual columns, which are composed by small elongated crystals. Otherwise, the first studies about intercolumnar shear sliding during indentation test and formation of steps at the coating–substrate interface were published by [34], Bhowmick et al. [14], Suresha et al. [16] as well as Carhvalho and De Hosson [35].
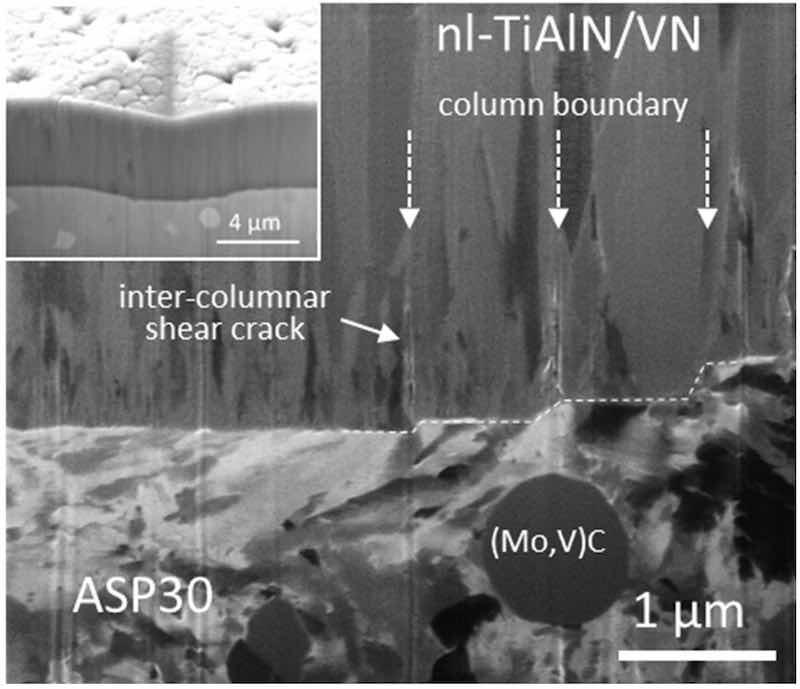
Figure 5. SEM micrographs of the FIB cross-sections through the 1000 mN indent on TiAlN/VN nanolayer coating deposited on the ASP30 tool steel substrate. The dashed line shows the steps on the substrate surface, while the dashed and solid arrows indicate the boundary between two adjacent columns, and the intercolumnar shear cracks, respectively. The coating thickness inside and outside of the indent area is the same (see inset).
By a comparison of the coating thickness measured outside and inside of the Vickers indent area, we tried to identify plastic deformation of a hard coating due to intergranular sliding. As is evident from the cross-sectional SEM images (Figure 4a,b) of the indent performed above the place of the tempered martensite matrix, the thickness of coatings measured inside the indents (t1) does not differ from the thickness measured outside the indents (t2). Based on this, we can conclude that plastic intergranular deformation of the coating in this place did not occur. However, the question is how the brittle hard coating adapts to the relatively strong deformation of the substrate. It can be seen from the cross-sectional SEM image of the indent that the coating accommodates the deformation of the substrate by intercolumnar shear sliding. Bending and stretching of the coating during the indentation test due to plastic deformation of the substrate induce tensile stresses at the substrate–coating interface. These stresses were released by the formation of the shear cracks at the columnar boundaries, rather than adhesion failure at the substrate–coating interface. Therefore, splitting of adjacent columns at the coating–substrate interface occurred (see Figure 4c and Figure 5). Shear cracks generated in this way then propagate towards the coating surface.
From this explanation, we can conclude that the dominant deformation mechanisms are intercolumnar shear sliding between adjacent columns under the indentation edges and crack formation at the interface between adjacent columns. No other damages were observed in the coating. That intercolumnar shear sliding is the dominant deformation mechanism in hard coatings was shown by other authors too [35,36].
The plastic deformation of the coating and the substrate material at the carbide sites is, however, quite different (Figure 4c,d). In this case, the thickness of the coating in the middle of the indent is about 15% lower than that outside of the indent. This proves that plastic deformation of the coating had occurred. Deformation mechanisms are most likely related to the dislocation movement as well as sliding along grain boundaries. More reliable information can be obtained only by detailed transmission electron microscopy examination of the deformed zone [37]. On the other hand, the plastic deformation of the carbide inclusion is much smaller than that of the tempered martensite matrix at the same indentation load, while the spacing of steps in the carbide inclusion is almost two times smaller in comparison to that of the tempered martensite matrix. As in the case of the tempered martensite matrix, the brittle hard coating adapts to the deformation of the carbide inclusion by intercolumnar shear slipping. However, no shear cracks at the adjacent columns or other damages were observed.
3.2. Fracture Behavior of the nl-(Cr,Al)N Nanolayer Hard Coatings
The nl-(Cr,Al)N nanolayer hard coatings with different Al/Cr atomic ratios were sputter deposited on D2 and H11 tool steel substrates in the same batch. The deposition process, performed in the CC800/9 sputtering system, has been described in detail elsewhere [38]. For deposition of the nl-(Cr,Al)N nanolayer coatings, we employed the approach with two targets composed of chromium and aluminum triangular segments, as well as two rectangular targets, one of chromium and another one of aluminum. The resulting nl-(Cr,Al)N nanolayer coating is composed of several hundred layers of CrN, AlN and (Cr,AlN). Using triangular targets, we were able to prepare in a single batch a set of coatings with a compositional gradient along the height of the vacuum chamber. The coatings on the substrates, which were located in the bottom positions, were richer in aluminum, and those in the upper ones with chromium. The thickness of the coatings with the highest concentrations of chromium was significantly higher than that with the highest concentrations of aluminum. The thickness difference can be explained by the difference in the sputtering yield of both target materials. Thus, the deposition rate of pure chromium coating is approximately twice as high as that for aluminum.
As mentioned earlier, the substrate material significantly influences the deformation behavior of the coated samples. The composite hardness decreases with indentation load and it approaches the value of bare substrate at the highest load. As a general rule, the measured coating hardness is reliable if the indentation depth is less than one-tenth of the coating thickness. However, due to the effect of surface irregularities, indents may not be well formed at shallow depths, leading to artificially high hardness values that do not accurately represent the coating’s plastic behavior. In order to avoid all these problems as much as possible, hardness should be calculated for different maximum applied loads and be presented as a function of the relative penetration depth x/t (x—actual penetration depth; t—coating thickness). The correct values of hardness and elastic modulus are determined for relative indentation depths lower than 0.1 and actual penetration depths higher than 100 nm. Representative values of hardness (H), elastic modulus (E) and H3/E2 ratio of nl-(Cr,Al)N nanolayer coatings deposited at different heights in the deposition chamber are presented in Table 2. The chemical composition of the coatings obtained from EDS measurements, Al/Cr atomic ratio, total thickness of coating (t), modulation period (λ), surface roughness (Sa) and the loads Fc at which the first cracks appeared (Figure 6) in the coating during indentation test are also added.
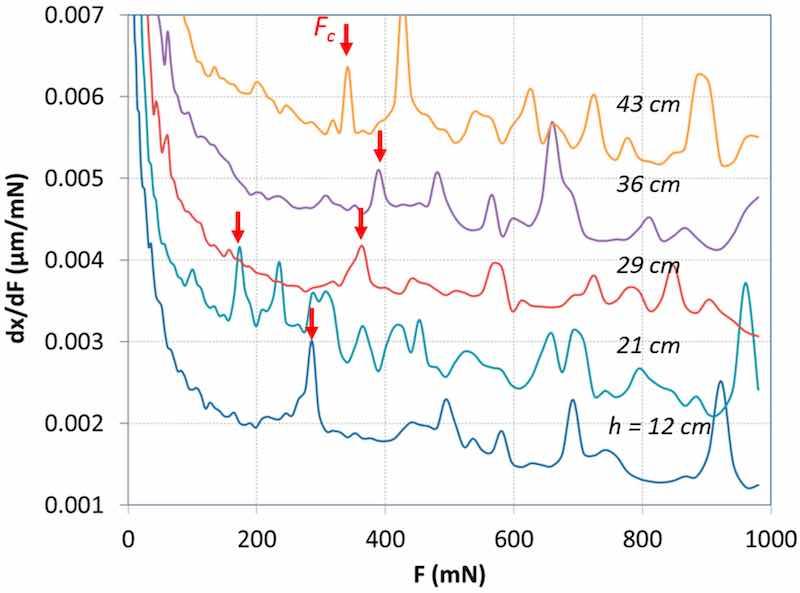
Figure 6. First derivative of displacement with respect to load (dx/dF) as a function of load for nl-(Cr,Al)N coatings deposited at different heights in the deposition chamber (h) as a function of the indentation load (F). The vertical positions of the samples in the vacuum chamber were as follows: 12 cm, 21 cm, 29 cm, 36 cm and 43 cm. The arrows point to the loads Fc where the first cracks appeared in the coating during the indentation test.
Table 2. Properties of (Cr,Al)N nanolayer coatings deposited at different vertical positions (h): composition, Al/Cr atomic ratio, thickness (t), modulation period (λ), hardness (H), elastic modulus (E), H/E ratio, H3/E2 ratio, surface roughness (Sa) and the indentation load at which first cracks start to appear (Fc).
| h | AlEDX | CrEDX | Al/Cr | t | λ | H | E | H3/E2 | Sa | Fc |
| (cm) | (at.%) | (at.%) | (µm) | (nm) | (GPa) | (GPa) | (GPa) | (nm) | (mN) | |
| 13 | 28.9 | 22.2 | 1.3 | 3.75 | 6 | 25.8 ± 1 | 276 | 0.225 | 20.8 ± 1 | 296 |
| 20 | 25.5 | 25.4 | 1 | 5.21 | 8 | 17.6 ± 1 | 271 | 0.074 | 24.4 ± 1 | 190 |
| 29 | 18.5 | 32.3 | 0.57 | 6.1 | 9.4 | 20 ± 1 | 275 | 0.105 | 24.7 ± 1 | 338 |
| 36 | 14.2 | 37 | 0.38 | 7.01 | 10.8 | 18.9 ± 1 | 241 | 0.117 | 23.5 ± 1 | 380 |
| 43 | 10.5 | 40.5 | 0.26 | 7.54 | 11.6 | 19.1 ± 0.8 | 259 | 0.104 | 20 ± 1 | 370 |
For indentation measurements of the nl-(Cr,Al)N nanolayer hard coatings with different compositions, we chose the H11 tool steel substrate, which is characterized by a homogeneous microstructure. In this way, we avoided the influence of large carbide grains in the tool steel substrates on the measured mechanical properties of the coating. Namely, in Section 3.1, we showed that in the case of the D2 tool steel substrate, this influence is not negligible.
From the tribological point of view, the key parameter is the H3/E2 ratio (plasticity index) [39,40]. This ratio is a strong indicator of coating resistance to plastic deformation and fracture—the higher the index, the higher the indentation loads needed to induce plastic deformation and cracking. The values of the plasticity index for the set of nl-(Cr,Al)N coatings with a gradient composition are listed in Table 2. As we can see, this index changes considerably with the Al/Cr atomic ratio (i.e., with the vertical position of the sample). Higher values were measured for the Cr-rich and Al-rich coatings, while the minimum value was obtained for coatings with an intermediate composition. Such a dependence of the plasticity index could be related to changes in the columnar microstructure and texture of the coatings. As mentioned in Section 3.1, the predominant mechanism of plastic deformation in columnar coatings during nanoindentation test is the intercolumnar shear sliding. In our previous investigations, performed on the same set of samples, we found that the coatings with different compositions also differ slightly in texture and size of columns [38]. We found that the coating with the smallest plasticity index has the most pronounced (111) texture and relatively large columns.
A reasonable correlation was observed between the indentation loads required for crack formation (Fc) and the plasticity index (H3/E2), as shown in Figure 7. This correlation aligns well with the widely accepted understanding that the plasticity index (H3/E2) is a reliable indicator of a material’s resistance to fracture. However, while the plasticity index strongly indicates that the Al-rich coatings have the highest fracture resistance, this conclusion is not straightforward when considering the critical load results. When interpreting these results, it is important to account for changes not only in the composition of the coatings with height, but also in their total thickness, which generally leads to a gradual increase in the critical load as thicker coatings can absorb more energy before cracking. While there is a linear relationship between the coating thickness and the sample height, the critical load values for Al-rich coatings deviate from this pattern, consistently lying above what would be expected from a purely linear trend. This discrepancy suggests that Al-rich coatings exhibit higher fracture resistance, which is in agreement with the plasticity index results.
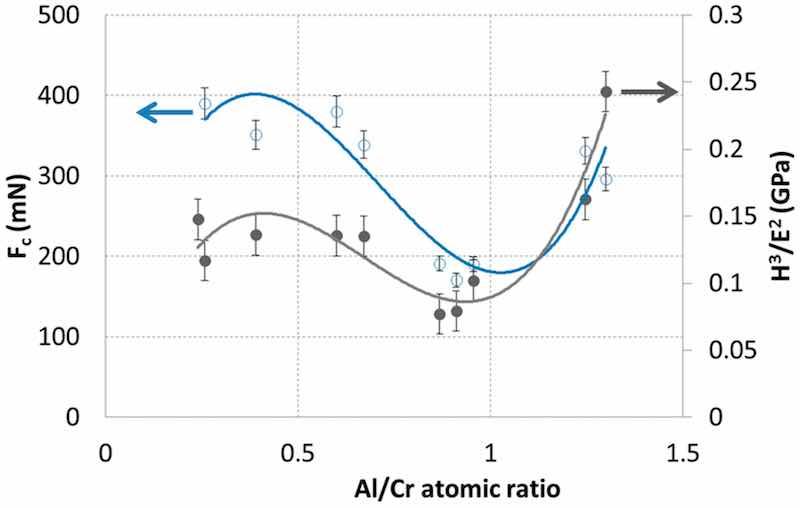
Figure 7. Plasticity index H3/E2 of nl-(Cr,Al)N nanolayer hard coatings and the load at which cracks start to appear (Fc) as a function of the Al/Cr atomic ratio. The nl-(Cr,Al)N coatings were sputter deposited on H11 tool steel substrates.
3.3. Influence of the Substrate Rotation Mode on the Fracture Resistance of the TiAlN Hard Coating Prepared by Cathodic Arc Deposition
The rotation mode of the substrates has a significant influence on the deposition rate, the intensity of ion bombardment during the deposition process and consequently on the microstructure of the coating [41]. Therefore, we can expect that it also has an influence on their cracking resistance. In the case of single rotation, the flux of depositing atoms and ions is perpendicular to the substrate surface, while the target–substrate distance is constant. At the moment when the substrate travels past the target, the deposition rate is very high, while in the next period, when the substrate moves away from the target, it drops to zero. Under such conditions, a coating with a pronounced columnar microstructure grows on the substrate. In contrast, in the case of 2-fold and 3-fold rotations, where the trajectory of the substrates is very complex, the substrate orientation, target–substrate distance and the angle of incidence of atoms and ions changes throughout the deposition process. In comparison with the 1-fold rotation mode, the deposition rate is much lower, while the intensity of ion bombardment is higher. Therefore, the microstructure of these coatings, especially those deposited in triple rotation, is more compact than in the case of 1-fold rotation.
In this study, we investigated the influence of the substrate rotation mode on the cracking resistance of the coatings deposited by cathodic arc evaporation. The cross-sectional SEM images of these coatings, deposited on the D2 tool steel substrate in the same batch, are shown in Figure 8. During deposition, the substrates were positioned at the same height in the vacuum chamber and at the same substrate–target distance. The thicknesses of coatings (t), determined by the ball crater technique, were as follows: 7.7 µm, 3.6 µm and 2.6 µm for 1-fold, 2-fold and 3-fold rotations, respectively. These thickness values are about 30% higher than those determined from SEM images on FIB cross-sections (Figure 8), because these images were taken while tilting the sample. Indentation tests were performed on substrate locations where no carbides were present under the TiAlN coating. The load Fc at which the first cracks appeared in the coating during the indentation test is the highest for the coating prepared with 1-fold rotation (850 ± 50 mN), considerably lower for 2-fold rotation (around 200 ± 10 mN) and the lowest in 3-fold rotation (around 100 ± 5 mN). Such a result of the measurements is surprising, because based on the explanation from the previous paragraph we would expect a higher cracking resistance for coatings with finer microstructure prepared using 2-fold rotation and especially in the case of 3-fold rotation. However, we must consider the large difference in the thickness of coatings prepared by 1-, 2- and 3-fold rotations. To avoid the plastic deformation of the substrate material, the relative penetration depth at a certain load must be less than 0.1 [42]. In the coating prepared with single rotation, where the thickness of the layer is 7.7 µm, this value is exceeded at the indentation load of 500 mN. For much thinner coatings, prepared by 2-fold and 3-fold rotation, this critical load is 100 mN and 50 mN, respectively. This means that, at the same indentation load, the plastic deformation of the substrate material was the largest in the sample prepared with 3-fold rotation, slightly smaller in the case of 2-fold rotation and much smaller for 1-fold rotation. As we explained in Section 3.1, the bending and stretching of the coating during the indentation test due to elastic and plastic deformation of the substrate induce tensile stresses at the substrate–coating interface, which are generally released by the formation of shear cracks at the columnar boundaries. In our case, this effect is most pronounced in the sample prepared by 3-fold rotation.
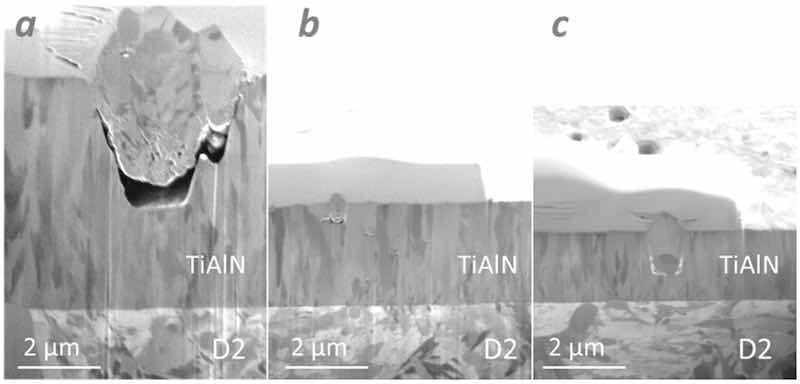
Figure 8. SEM images of FIB cross-sections of TiAlN hard coatings deposited by cathodic arc evaporation on D2 tool steel substrate. The samples were prepared in a single batch using 1-fold (a), 2-fold (b) and 3-fold (c) rotation of the substrate. The magnification scales are identical.
In order to reduce the influence of the relatively high surface roughness characteristic of the coating prepared by the cathodic arc, the test was performed on both as-deposited (Figure 9a) and polished samples (Figure 9b). The same values of Fc loads were obtained on both kind of samples. The only difference is that dx/dF curves measured on polished samples are smoother. This could mean that the appearance of weak peaks on the curve is related to the coating surface irregularities (e.g., nodular defects).
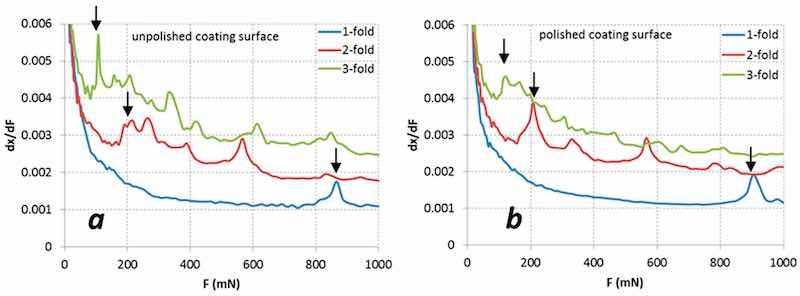
Figure 9. The first derivative of the displacement dx/dF as a function of the indentation load F for TiAlN deposited by cathodic arc evaporation on D2 tool steel substrate using one-fold, two-fold and three-fold rotation. The indentation tests were performed on unpolished (a) and polished (b) coating, deposited on the tempered martensite matrix of the D2 substrate area. The arrows point to the loads Fc where the first cracks appeared in the coating during the indentation test.
The fracture toughness (KIC) of TiAlN single-layer coatings prepared by 1-fold, 2-fold and 3-fold rotations was also determined at room temperature by in situ scanning electron microscopy micro-cantilever deflection tests (Figure 10). All cantilevers were milled in the same geometry. More details of fracture toughness measurements are described in [22]. The fracture toughness of coating was the largest for the sample prepared with 1-fold rotation, much smaller in the case of 2-fold rotation and the smallest for 3-fold rotation. These measurements are in good agreement with the measurements of the critical force Fc at which the first cracks appeared during the indentation test. We can see that the standard deviation of fracture toughness measurement for the samples prepared with 1-fold rotation is much higher than for 2-fold and 3-fold rotation. The reason is most likely that the coating is almost twice as thick as the other two. Therefore, more material has to be removed to keep the geometry of the cantilevers the same. Possible residue material could also cause a higher variation in the KIC value.
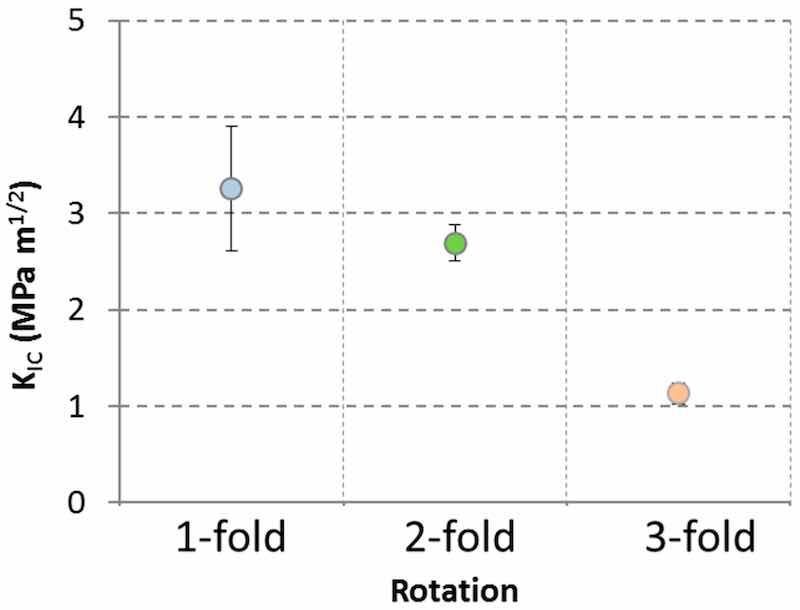
Figure 10. Fracture toughness KIC of TiAlN hard coating determined for different substrate rotation mode: 1-fold, 2-fold and 3-fold. The measurements were performed by micro-cantilever deflection test.
3.4. Influence of Growth Defects on the Nanoindentation Test
Growth defects, present in all PVD hard coatings, have deleterious effect on their cracking resistance [43]. During the indentation test, the weak boundaries of the growth defects in the matrix and the voided region beneath act as preferential sites for crack formation and propagation. A complex network of cracks is formed at growth defects incorporated into the hard coating if they are present underneath an indent or in its immediate vicinity. For example, Figure 11 shows the SEM image of an indent made near a nodular defect in the sputter-deposited TiAlN/TiSiN nanolayer coating. We can see that the cracks formed under the indent spread all the way to the defect. The reason for this phenomenon could be in the local stress distribution as it is changed significantly in the vicinity of the growth defect.
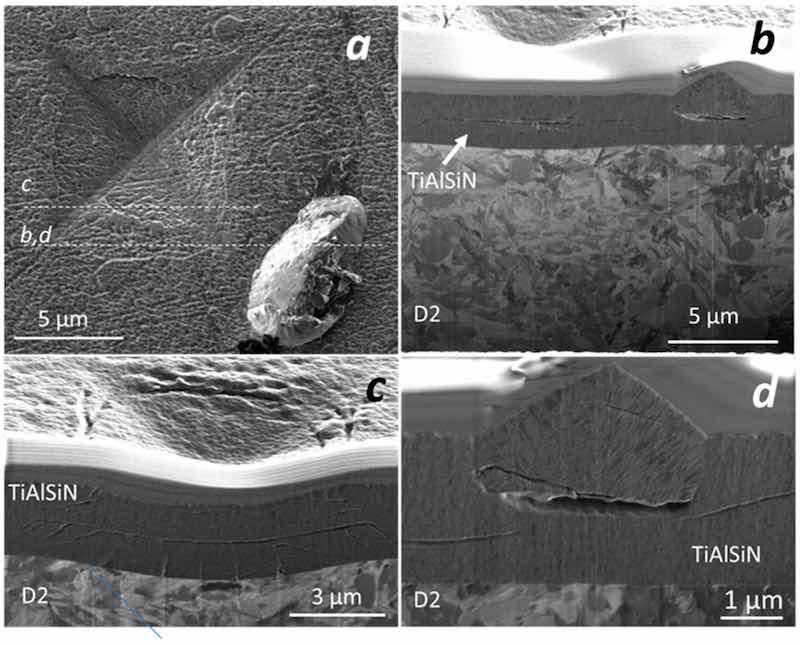
Figure 11. (a) Top view SEM image of 1000 mN indent on sputter-deposited TiAlSiN hard coating on D2 tool steel substrate and (b–d) SEM image of the FIB cross-section at the site of the indent (c) and at the site of the nodular growth defect in the immediate vicinity (b,d).
4. Conclusions
The cracking resistance of different sputter-deposited hard coatings was evaluated using a depth-sensing indentation test. The effect of the inhomogeneous microstructure of substrates on the fracture resistance of the TiAlN coating was investigated using a D2 cold work tool steel substrate, where the indentation tests were performed at sites of carbide inclusions and the tempered martensite steel matrix. A comparison of nanoindentation load–displacement data at both sites showed significant differences. The indentation curve measured on the tempered martensite site shows the first pop-in at a load of around 200 mN, while such pop-ins were not observed on the curve that was measured on the site of carbide inclusions in the load range of 1–1000 mN. The nanoindentation load–displacement data were compared with SEM images of FIB cross-section of both indent types. We did not observe any cracks in the coating deposited on carbide inclusions, while intercolumnar shear sliding and cracks were the dominant coating deformation mechanism at site of tempered martensite matrix. We also found that there was no difference in coating thickness measured inside and outside of the Vickers indent if it was at a site where the martensitic matrix is under the coating. In contrast, the coating thickness under the indent was 15% smaller if it was at a site where the carbide inclusion is located on the steel substrate surface. The mechanism of such coating plastic deformation is most likely related to the dislocation movement as well as sliding along grain boundaries.
Using nanoindentation measurements on a set of nl-(Cr,Al)N nanolayer hard coatings with different Cr/Al atomic ratios, which were prepared in a single batch, we showed that there is a rather good correlation between Fc loading and the plasticity index H3/E2.
We also analyzed the effect of the substrate rotation mode on the cracking resistance of the TiAlN coatings, deposited by cathodic arc evaporation. The highest value of Fc was obtained on the sample prepared by 1-fold rotation, where the value of relative penetration depth was much higher in comparison with the samples prepared by 2-fold and 3-fold rotation. The measurements performed by micro-cantilever deflection test on the same set of samples also showed that the coatings prepared with 1-fold rotation have the highest fracture toughness, and those prepared with triple rotation have the lowest.
The impact of growth defects on the cracking resistance of the hard coatings was also confirmed.
Written by Peter Panjan 1, Aleksandar Miletić2, Aljaž Drnovšek1, Pal Terek2, Miha Čekada1, Lazar Kovačević2and Matjaž Panjan1
- Jožef Stefan Institute, Jamova 39, 1000 Ljubljana, Slovenia
- Faculty of Technical Sciences, University of Novi Sad, Trg Dositeja Obradovića 6, 21000 Novi Sad, Serbia
Author Contributions: P.P.: design of experiments, nanoindentation tests, interpretation of experimental results and manuscript writing; A.M.: design of experiment and manuscript review; A.D.: SEM and FIB analysis, micro-cantilever deflection test and manuscript writing; P.T.: design of experiments, methodology, funding acquisition and manuscript review; M.Č.: project administration, funding acquisition and manuscript review; L.K.: design of experiments, methodology and manuscript review; M.P.: interpretation of experimental results and manuscript review. All authors have read and agreed to the published version of the manuscript. The authors would also like to thank Jožko Fišer for technical assistance.
Funding: This work was supported by the Slovenian Research Agency (program P2-0082) and by the Ministry of Science, Technological Development and Innovation, Serbia (Contract No. 451-03-65/2024-03/200156) and the Faculty of Technical Sciences, University of Novi Sad through project “Scientific and Artistic Research Work of Researchers in Teaching and Associate Positions at the Faculty of Technical Sciences, University of Novi Sad” (No. 01-3394/1). We also acknowledge funding from the European Regional Development Funds (CEEN Nanocenter): OP13.1.1.2.02.006.
Conflicts of Interest: The authors declare no conflicts of interest.
References
- Mayrhofer, P.H.; Mitterer, C.; Hultman, L.; Clemens, H. Microstructural design of hard coatings. Prog. Mater. Sci. 2006, 51, 1032–1114.
- Musil, J. Hard nanocomposite coatings: Thermal stability, oxidation resistance and toughness. Surf. Coat. Technol. 2012, 207, 50–65.
- Zhang, S.; Zhang, X. Toughness evaluation of hard coatings and thin films. Thin Solid Film. 2012, 520, 2375–2389.
- Jirout, M.; Musil, J. Effect of addition of Cu into ZrOx film on its properties. Surf. Coat. Technol. 2006, 200, 6792–6800.
- Cairney, J.M.; Hoffman, M.J.; Munroe, P.R.; Martin, P.J.; Bendavid, A. Deformation and fracture of Ti–Si–N nanocomposite films. Thin Solid Film. 2005, 479, 193–200.
- Daniel, R.R.; Meindlhumer, M.; Zalesak, J.; Sartory, B.; Zeilinger, A.; Mitterer, C.; Keckes, J. Fracture toughness enhancement of brittle nanostructured materials by spatial heterogeneity: A micromechanical proof for CrN/Cr and TiN/SiOx multilayers. Mater. Des. 2016, 104, 227–234.
- Bobzin, K.; Kalscheuer, C.; Tayyab, M. A case study on fatigue damage in PVD coated tool steel under cyclic bending load. Surf. Coat. Technol. 2024, 478, 130505.
- Baragetti, S.; Lavecchia, G.; Terranova, A. Variables affecting the fatigue resistance of PVD-coated components. Int. J. Fatigue 2005, 27, 1541–1550.
- Bai, Y.; Gao, J.; Guo, T.; Gao, K.; Volinsky, A.A.; Pang, X. Review of the fatigue behavior of hard coating-ductile substrate systems. Int. J. Miner. Metall. Mater. 2021, 28, 46–55.
- Hu, C.; Zhao, L.; Zhang, Y.; Du, Z.; Deng, Y. The Influence of Hard Coatings on Fatigue Properties of Pure Titanium by a Novel Testing Method. Materials 2024, 17, 835.
- Wiklund, U.; Bromark, M.; Larsson, M.; Hedenqvist, P.; Hogmark, S. Cracking resistance of thin hard coatings estimated by four-point bending. Surf. Coat. Technol. 1997, 91, 57–63.
- Zhang, S.; Sun, D.; Fu, Y.; Du, H. Effect of sputtering target power on microstructure and mechanical properties of nanocomposite nc-TiN/a-SiNx thin films. Thin Solid Film. 2004, 447–448, 462–467.
- Azizpour, A.; Hahn, R.; Klimashin, F.F.; Wojcik, T.; Poursaedi, E.; Mayrhofer, P.H. Deformation and Cracking Mechanism in CrN/TiN Multilayer Coatings. Coatings 2019, 9, 63.
- Bhowmick, S.; Bhide, R.; Hoffman, M.; Jayaram, V.; Biswas, S.K. Fracture mode transitions during indentation of columnar TiN coatings on metal. Philos. Mag. 2005, 85, 2927–2945.
- Wieciński, P.; Smolik, J.; Garbacz, H.; Kurzydłowski, K.J. Failure and deformation mechanisms during indentation in nanostructured Cr/CrN multilayer coatings. Surf. Coat. Technol. 2014, 240, 23–31.
- Math, S.; Suresha, S.J.; Jayaram, V.; Biswas, S.K. Indentation of a hard film on a compliant substrate: Film fracture mechanisms to accommodate substrate plasticity. J. Mater. Sci. 2006, 41, 7830–7837.
- Suresha, S.J.; Math, S.; Jayaram, V.; Biswas, S.K. Toughening through multilayering in TiN–AlTiN films. Philos. Mag. 2007, 87, 2521–2539.
- Kossman, S.; Bigerelle, M. Pop-In Identification in Nanoindentation Curves with Deep Learning Algorithms. Materials 2021, 14, 7027.
- Hainsworth, S.; McGurk, M.; Page, T. The effect of coating cracking on the indentation response of thin hard-coated systems. Surf. Coat. Technol. 1998, 102, 97–107.
- Zhao, X.; Xie, Z.; Munroe, P. Nanoindentation of hard multilayer coatings: Finite element modelling. Mater. Sci. Eng. A 2011, 528, 1111–1116.
- Ast, J.; Ghidelli, M.; Durst, K.; Goeken, M.; Sebastiani, M.; Korsunsky, A.M. A review of experimental approaches to fracture toughness evaluation at the micro-scale. Mater. Des. 2019, 173, 107762.
- Drnovšek, A.; Vo, H.T.; de Figueiredo, M.R.; Kolozsvári, S.; Hosemann, P.; Franz, R. High temperature fracture toughness of single-layer CrAlN and CrAlSiN hard coatings. Surf. Coat. Technol. 2021, 409, 126909.
- Sebastiani, M.; Johanns, K.E.; Herbert, E.G.; Carassiti, F.; Pharr, G.M. A novel pillar indentation splitting test for measuring fracture toughness of thin ceramic coatings. Philos. Mag. 2014, 95, 1928–1944.
- Sebastiani, M.; Johanns, K.E.; Herbert, E.G.; Pharr, G.M. Measurement of fracture toughness by nanoindentation methods: Recent advances and future challenges. Curr. Opin. Solid State Mater. Sci. 2015, 19, 324–333.
- Reichardt, A.; Ionescu, M.; Davis, J.; Edwards, L.; Harrison, R.P.; Hosemann, P.; Bhattacharyya, D. In situ micro tensile testing of He+2 ion irradiated and implanted single crystal nickel film. Acta Mater. 2015, 100, 147–154.
- Amer, M.; Hayat, Q.; Janik, V.; Jennett, N.; Nottingham, J.; Bai, M. A Review on In Situ Mechanical Testing of Coatings. Coatings 2022, 12, 299.
- Wang, A.-N.; Yu, G.-P.; Huang, J.-H. Fracture toughness measurement on TiN hard coatings using internal energy induced cracking. Surf. Coat. Technol. 2014, 239, 20–27.
- Panjan, P.; Drnovšek, A.; Dražić, G. Influence of Growth Defects on the Oxidation Resistance of Sputter-Deposited TiAlN Hard Coatings. Coatings 2021, 11, 123.
- Panjan, P.; Drnovšek, A.; Terek, P.; Miletić, A.; Čekada, M.; Panjan, M. Comparative Study of Tribological Behavior of TiN Hard Coatings Deposited by Various PVD Deposition Techniques. Coatings 2022, 12, 294.
- Panjan, P.; Drnovšek, A.; Mahne, N.; Čekada, M.; Panjan, M. Surface Topography of PVD Hard Coatings. Coatings 2021, 11, 1387.
- Bhowmick, S.; Jayaraam, V.; Biswas, S. Deconvolution of fracture properties of TiN films on steels from nanoindentation load displacement curves. Acta Mater. 2005, 53, 2459–2467.
- Miletić, A.; Panjan, P.; Čekada, M.; Kovačević, L.; Terek, P.; Kovač, J.; Dražoć, G.; Škorić, B. Nanolayer CrAlN/TiSiN coating designed for tribological applications. Ceram. Int. 2021, 47, 2022–2033.
- Panjan, M.; Čekada, M.; Panjan, P.; Zupanič, F.; Kölker, W. Dependence of microstructure and hardness of TiAlN/VN hard coatings on the type of substrate rotation. Vacuum 2012, 86, 699–702.
- Whitehead, A.J.; Page, T.F. Nanoindentation studies of thin film coated systems. Thin Solid Films 1992, 220, 277–283.
- Carvalho, N.J.M.; De Hosson, J.T.M. Deformation mechanisms in TiN/(Ti,Al)N multilayers under depth-sensing indentation. Acta Mater. 2006, 54, 1857–1862.
- Molina-Aldareguia, J.M.; Lloyd, S.J.; Odén, M.; Joelsson, T.; Hultman, L.; Clegg, W.J. Deformation structures under indentations in TiN/NbN single-crystal multilayers deposited by magnetron sputtering at different bombarding ion energies. Philos. Mag. A 2002, 82, 1983–1992.
- Rzepiejewska-Malyska, K.A.; Mook, W.M.; Parlinska-Wojtan, M.; Hejduk, J.; Michler, J. In situ scanning electron microscopy indentation studies on multilayer nitride films: Methodology and deformation mechanisms. J. Mater. Res. 2009, 24, 1208–1221.
- Drnovšek, A.; Kukuruzović, D.; Terek, P.; Miletić, A.; Čekada, M.; Panjan, M.; Panjan, P. Microstructural, Mechanical and Oxidation Resistance of Nanolayer Sputter-Deposited CrAlN Hard Coatings. Coatings 2023, 13, 2096.
- Tsui, T.Y.; Pharr, G.M.; Oliver, W.C.; Bhatia, C.S.; White, R.L.; Anders, S.; Anders, A.; Brown, I.G. Nanoindentation and Nanoscratching of Hard Carbon Coatings for Magnetic Disks. MRS Proc. 1995, 383, 447–452.
- Musil, J.; Jirout, M. Toughness of hard nanostructured ceramic thin films. Surf. Coat. Technol. 2007, 201, 5148–5152.
- Panjan, M. Influence of substrate rotation and target arrangement on the periodicity and uniformity of layered coatings. Surf. Coat. Technol. 2013, 235, 32–44.
- Bull, S. Modelling the hardness response of bulk materials, single and multilayer coatings. Thin Solid Film. 2001, 398-399, 291–298.
- Costa, M.Y.P.; Venditti, M.L.R.; Cioffi, M.O.H.; Voorwald, H.J.C.; Guimarães, V.A.; Ruas, R. Fatigue behavior of PVD coated Ti–6Al–4V alloy. Int. J. Fatigue 2011, 33, 759–765.


