There are several methods of achieving colors on anodized aluminum: Electrolytic coloring with metal salts, organic dyeing, electrolytic coloring with metal salts and organic dyeing (overdye) and interference coloring.
 Kevin JanisThe basic parameters of seal and coating quality will be examined, as they are requirements for achieving light fastness, regardless of coloring method. The impact on light fastness based on dye selection, dye bath maintenance and dye bath processing conditions will be discussed.
The various coloring processes with an emphasis on dye and overdye will be explained. Finally, a case study involving the Biomedical Research Centre located at Justus Liebig University in Giessen, Germany, designed by the architectural firm Behles and Jochimsen of Berlin, Germany, will be presented to showcase the light fastness capabilities of architectural dyeing and overdying (Sandalor Process).
Introduction
In the United States, the quest for additional color options in anodized aluminum used for architectural applications has been ongoing since its first use. Alcoa patented its “color” anodizing process in 1923 [1]. The color achieved was what is today called a clear finish. In 1923, clear anodize was unique in its appearance and color.
Clear anodize finishes have remained a staple in the color palette for architectural anodized aluminum to this day. However, significant developments in coloring technology have since been added. The electrodeposition of metals into the pore structure of the anodized aluminum (electrolytic coloring) has produced an architecturally stable color selection. Nickel, cobalt and tin (of which tin is the most predominant today) salts have produced earth tone shades ranging from champagne to black. Copper salts have been used to produce copper and burgundy tones. Dye technology advanced to offer the potential of light fast red, blue, green, turquoise, gold and black that meet architectural specifications. Combination electrolytic and organic dyeing has been developed to offer more colors and enhanced light fastness performance.
In the United States, the publication by FGIA (Fenestration and Glazing Industry Alliance) “AAMA 611-20: Voluntary Specification for Anodized Aluminum” set the standards for architectural anodized finishes. In addition to quality standards for coating thickness, coating weight, coating density, seal quality, color and gloss uniformity and corrosion resistance, this specification sets the maximum allowable color change due to environmental exposure [2].
Currently, most architectural anodized aluminum is colored as either clear or one of the earth tones. It is the author’s contention that this limited palette offering inhibits market growth and endangers existing market share. Competitive finishes offer greater color selection with ever increasing capabilities in the areas of corrosion resistance and light fastness. However, anodized aluminum offers an aesthetic that cannot be matched by these competitive finishes because it maintains the natural metallic beauty of the metal. Additional color options have been available for decades and have been used on many buildings enduring the elements while preserving their color. The European market has embraced this technology to a far greater extent than the United States market.
Coloring Techniques
Electrolytic color using tin salts is the predominant method of coloring anodized architectural aluminum in the United States. Approximately six colors are produced with some specialty colors generated along the continuum between clear anodize and electrolytic black. The colors are champagne, light bronze, medium bronze, dark bronze, extra dark and black.
The production of electrolytic colored architectural aluminum follows a similar process to the other methods, except for the color process. Raw aluminum parts are racked and secured to a flight bar that carry the parts through the process tanks. The parts are cleaned to remove any grease or soil. The parts are etched to reduce gloss and remove imperfections in an acid etch and/or caustic etch. In some cases, an enhanced gloss (bright finish) may be desired, in which case the part undergoes a chemical brightening step (bright dip) or an electrochemical polishing step (e-polish). After the gloss modification step, the parts are placed in a special acid tank to remove any residual intermetallics (smut) and oxides. The parts are now fully prepared for the anodize step.
After anodizing achieves the required coating thickness (usually 0.7 mil), the parts are placed in the electrolytic color tank. The desired color is obtained by monitoring the time and applied voltage to the parts. The longer the parts are processed, the darker the end color. Color is usually checked at this stage. If the parts are too light, they may be placed back in the tank and processed further. If the parts are too dark, the deposited metal can be removed through special rinsing. Once the desired color is achieved, the parts go to the sealing tank. The sealing tank is required to close the pores of the anodized aluminum to ensure corrosion resistance and light fastness.
The use of copper salts follows a similar process to achieve copper and burgundy colors. The process can be a two-step process like above, substituting a copper salt bath for a tin salt bath or a three-step process where the copper salt is added to the standard tin electrolytic color bath. The three-step process is believed to increase color uniformity and increase corrosion resistance.
Organic dyeing follows the same process through the anodize tank. Instead of going into an electrolytic tin salt bath, the parts will usually be treated in a rinse containing nitric acid. The purpose of this specialized rinse tank is to fully activate the aluminum anodic oxide (AAO) coating to accept dye and to exchange sulfate ions (from the sulfuric acid anodizing process) trapped in the AAO porosity with nitrate ions. Sulfate ions are usually detrimental to the dyeing process by reducing the effective dye concentration.
After the nitric acid rinse tank, the parts will be placed in the organic dye bath. The concentration and composition of the dye tank determines the end color. Dye temperature is set based on the dye(s) selected. After the dye tank, the part is sealed in a similar fashion to electrolytic color.
The combination of electrolytic color and organic dye is known as overdying. It is a three-step process: Anodize, electrolytic color and organic dye. The electrolytic color step is usually champagne, light bronze or medium bronze in color. The depth of color achieved in this step will produce darker gradations of the base color produced by the subsequent dye tank. After coloring, the part will be rinsed and then dyed in the appropriate dye tank. Once the requisite color is achieved in the dye tank, it will be sealed. The electrolytic color step serves to offer additional color options. More importantly, it enhances the light fastness of the part.
Anodizing for Architectural Light Fastness
Pretreatment
Pretreatment includes all operations that occur before the anodize tank. Almost every training class on anodizing begins with metallurgy. Good quality aluminum is essential in ensuring light fastness for architectural applications. Alloys that will produce relatively clear AAO should be chosen. Proper extrusion or rolling techniques are required to produce consistent AAO coatings. Alloys (ISO standard) containing AlMg of 1-3 (rolled products) and AlMgSi of 0.5 -1 (extrusion molded) are typically used [3].
Anodizing requires good racking techniques to produce quality parts. Racks and racking points need to ensure sufficient contact area to carry the required current with even current distribution. Contact areas between racks and flight bars need to be kept clean. Contact between flight bars and electrical contact pads on the anodize and electrolytic color also need to be kept clean.
The cleaning process must remove all oil and soil from the surface of the aluminum. Removal and containing oils and soils prevents contamination in subsequent process tanks. Oil and grease can travel downstream to the seal tank when a cleaner tank is not properly maintained. This type of contamination can cause etch relief patterns, poor AAO consistency and areas of no color/white spots.
In the etching or brightening steps, consistent metal removal rates should be maintained. This involves a good balance of etching or brightening product and dissolved aluminum. Gloss factors into the end color. AAMA 611 allows for only a 5 delta E variation in color. The tighter the gloss, the more flexibility you have in subsequent steps. The tighter the color control of the finished product, the better chance of maintaining an acceptable color variation after weathering.
Finally, the deoxidation/desmut step should be carried out to maximum effectiveness. A surface that is rich in aluminum, free of alloying compounds and free of surface oxides will serve to initiate uniform anodization. This helps to ensure good color consistency in an electrolytic color and/or organic dye operation.
Pillars of Light Fastness
Dye Selection
Organic and inorganic dyes vary greatly in their resistance to ultraviolet radiation. None of the subsequent pillars of light fastness are dependent upon the dye product chosen. While following them will improve the light fastness performance of any dye, high performance dyes are a necessity in achieving the requirements of UV stability on an architectural or outside application.
Most dyes sold for the aluminum anodizing market have a light fast rating number. The number is derived using ISO 2135 [4]. The ratings are:
- Very Poor (1-2)
- Poor (3-4)
- Fair (5)
- Good (6)
- Very Good (6-7)
- Excellent (7-8)
- Architectural (8+)
Dyes with the Architectural (8+) are the only dyes that should be selected to help ensure light fastness specifications are met. These dyes have a demonstrated photochemical stability of the dyestuff molecules [5].
Dye Quantity in AAO
Light fastness in organically dyed anodized aluminum is influenced by the amount of dye adsorbed into the AAO. The more dye adsorbed, the greater the light fastness of the dyed article. For architectural quality light fastness, minimum quantities of adsorbed dye must be achieved. For this reason, pale or light shades of colors have limited light fastness applications, independent of the dye molecule selected. For example, a pink shade may be obtained using a low concentration or short immersion time using a light fast red dye. The resulting anodized article will not exhibit the same light fastness characteristics of a red dyed article using the same dye because the minimum threshold of dye adsorption will not be met. Similarly, colors that require a dye mixture will often not meet sufficient light fastness for architectural applications. For instance, a green color could be obtained mixing an architectural grade blue and yellow dye. However, neither dye will have sufficient adsorption to be architecturally light fast. For this reason, architectural quality dyes are usually single component dyes. Additionally, the color options for architectural dyed anodized aluminum are in the darker shades [6].
Process control of dye adsorption requires periodic testing. The process is simple and requires a small investment in equipment (UV-VIS Spectrophotometer). A test piece is anodized per the standard operation procedure for architectural aluminum. A panel or extruded flat stock is ideal for use as a test piece. Each alloy used should be tested. It is then dyed under the standard operation procedure until the desired colored is achieved. The part is rinsed, but not sealed. A minimum of 10 mm should be trimmed around the edge of the test piece. A 10 X 80 mm strip is then cut from the remaining piece.
Dye is stripped from the part using a special stripping solution and placed in a volumetric flask. Dilution will be dye dependent. The resulting solution is diluted to the volumetric mark and measured spectrophotometrically. Concentration is calculated per unit of area and checked against minimum standards [7].
Dye Bath Control
Minimum dye content in the AAO is achieved with dye bath control and anodizing parameters. The dye bath must be pH controlled within the recommended operation range of the dye in use. Dye temperatures must also be maintained, usually within a 5-10o C range. Dye baths must be adequately buffered. Buffers are either sodium acetate or ammonium acetate, depending on the dye. Dye buffering helps prevent pH changes and ensures sufficient activation of the dye to achieve maximum and consistent dyeing power.
Dye concentration must be maintained between certain minimums and maximums depending on the dye choice. Concentration correction should be made once the actual dye concentration becomes less than 95% of the required concentration [8]. Dye concentration is measured using a UV-VIS Spectrophotometer.
Relative dyeing power must be maintained at no less than 85% of a freshly prepared solution [9]. The method of analysis is comparable to measuring the quantity of dye in the AAO. In addition to producing a test piece and dyeing in the production bath, a separate piece is anodized and dyed in a freshly prepared sample bath. The quantity of dye from the production bath extracted from the test piece is divided by the quantity of dye extracted from the fresh bath. If this number is less than 85%, then the bath must be adjusted. Relative dyeing power can be increased by adding more dye, up to the maximum allowed content. If, at the maximum content allowed, the relative dyeing power is still less than 85%, the solution must be decanted to remove the contaminants lowering the dyeing power (usually aluminum and sulfate) and replenished with fresh dye and water.
Relative dyeing power needs to be monitored. The procedure follows the procedure for determining the amount of dye in the AAO and comparing it to the amount of dye in a test panel anodized with the production test panel but dyed in a new dye bath of the standard concentration [10].
Dye times also have certain recommended minimums, depending on the dye. Longer dye times ensure maximum depth of penetration of the dye. This greatly impacts overall light fastness of the finished product.
Anodizing Parameters
Quality AAO coating is the foundation of any high-quality coating and architectural anodized aluminum is no exception. Maximum dye uptake is usually achieved with low voltages (low current density) and high temperatures. Indoor applications and cosmetic applications that will not see direct sunlight and/or be exposed to natural weathering don’t need the high corrosion and UV resistance that architectural and outdoor applications require. These anodizing conditions work well for such an application.
In contrast, architectural and outdoor applications need a denser coating that will hold up against the elements. This requires anodizing conditions different from most other dyed anodized parts. High performance dyeing requires a much greater average minimum thickness of 1.0 mil (25 µm) with minimums no less than 0.8 mil (20µm) [11]. Overdyeing is often performed at an average of 0.8 mil to 1.0 mil, following minimum coating thickness of 0.7 mil per AAMA 611-20.
Free sulfuric acid concentrations should be 165-225 g/L (15-20%) with optimal concentration at 200 g/L (17.5%). Aluminum content is maintained at 5-15 g/L (8-12 ideal). Current density should be 12-18 amps per square foot. The highest current density that still achieves dye adsorption minimums is preferred for coating density, abrasion resistance, seal quality and corrosion resistance. Temperatures should be held between 66 and 70oF. Higher temperatures may be used with the correct anodizing additive. Clearer films are achieved with higher temperature, and this should be taken into consideration. Time will be dependent on current density [11].
Sealing
The AAMA-611 specification spells out minimum sealing standards using the Acid Dissolution Test [12] and Modified Dye Stain [13]. Additionally, parts need to meet certain salt spray hours (3000) [13] [14]. This is verified through periodic testing of panels run through the process used to produce the architectural anodized aluminum. For the purposes of achieving maximum light fastness, parts should unambiguously pass the modified dye stain, have much lower ADT numbers than the requisite 2.6 mg/dm2 and exceed 3000 hours salt spray. The sealing process should be of the highest quality.
Four seal types are generally used for sealing parts: Hot (boiling) water, hot nickel acetate, mid- temperature seals and cold seals. Dye performance characteristics of Clariant’s dye offerings was done with hot nickel acetate and hot water. In the United States, many jobs have been successfully performed using mid-temperature nickel seals. Other light fast and corrosion resistant applications have been successfully performed using cold seals. Cold seals offer additional light fast boosting properties for some dyes that contain metals. Cold seals have the highest dye bleed rate challenging the dye adsorption requirements. However, the light fast gain of the Ni-F-M bridge seems to surpass the loss of light fastness due to the reduction of dye adsorbed in some cases. All four methods are viable options.
Combination sealing technologies have also been used to greatly enhance both the corrosion resistance and light fastness of dyed AAO coatings. Cold seal followed by mid-temperature nickel in a two-step process has shown benefits. Cold seal followed by hot (near/at boil) for extended times has been used in automotive applications.
Top coating dyed AAO coatings with clear coat (wet or powder) with UV protective additives has also shown some promise, increasing both light fastness and corrosion resistance properties. The hurdles to these additional finishing steps are curing temperature, added cost, added handling and cost-effective methods of dealing with post topcoat rework.
Survey of Dyed and Overdyed Buildings
1970-1980
Several buildings utilizing the overdye procedure (Sandolar) in various colors built in Europe from 1973 to 1984. Colors include blue, green, black, red, cobalt, yellow, blue/green, turquoise and olive brown. The list is not complete, but does show a significant number of buildings, 59 in total: Germany (15), Austria/Hungary (2), Austria (14), Switzerland (19), Bulgaria (1), Holland (4), England (2) and Australia (2) [15].
Present
![Visitor Pavilion Eiffel Tower, Paris, France [16]](/images/images/reliantaluminum/janispaper/1.jpg) Visitor Pavilion Eiffel Tower, Paris, France [16]
Visitor Pavilion Eiffel Tower, Paris, France [16]
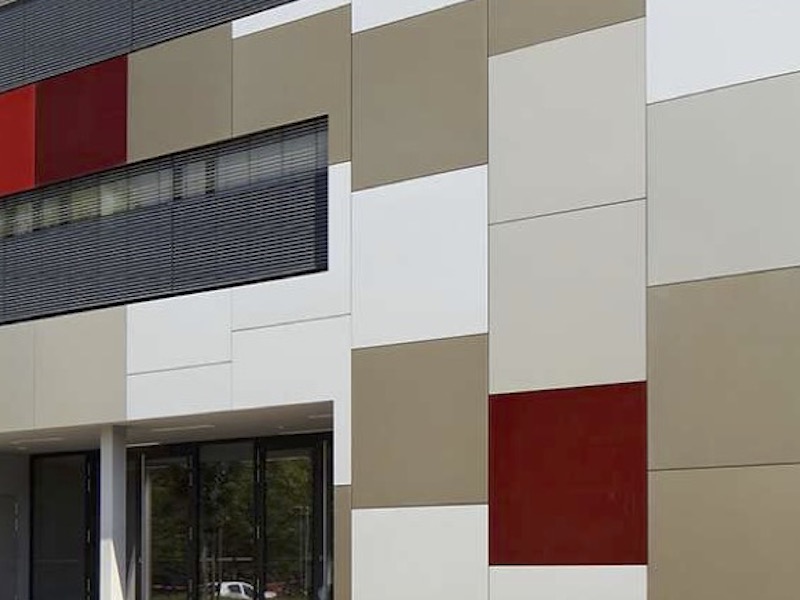
![Clinic in Westphalia, Lunen, Germany [16]](/images/images/reliantaluminum/janispaper/2.jpg) Clinic in Westphalia, Lunen, Germany [16]
Clinic in Westphalia, Lunen, Germany [16]
![Lalux Company Headquarters, Leudelange, Luxembourg [16]](/images/images/reliantaluminum/janispaper/3.jpg) Lalux Company Headquarters, Leudelange, Luxembourg [16]
Lalux Company Headquarters, Leudelange, Luxembourg [16]
![Aldi Parkhaus Sud Muhlheim An Der Ruhr, Germany [16]](/images/images/reliantaluminum/janispaper/4.jpg) Aldi Parkhaus Sud Muhlheim An Der Ruhr, Germany [16]
Aldi Parkhaus Sud Muhlheim An Der Ruhr, Germany [16]
![Schulz Feinbearbeitung Welzheim, Germany [16]](/images/images/reliantaluminum/janispaper/5.jpg) Schulz Feinbearbeitung Welzheim, Germany [16]
Schulz Feinbearbeitung Welzheim, Germany [16]
![Darnall Amphitheater, St. Benedict’s College, St. Joseph, MN, USA [17]](/images/images/reliantaluminum/janispaper/6.jpg) Darnall Amphitheater, St. Benedict’s College, St. Joseph, MN, USA [17]
Darnall Amphitheater, St. Benedict’s College, St. Joseph, MN, USA [17]
![Nic on Fifth, Minneapolis, MN, USA [17]](/images/images/reliantaluminum/janispaper/7.jpg) Nic on Fifth, Minneapolis, MN, USA [17]
Nic on Fifth, Minneapolis, MN, USA [17]
![Faribault Armory, Faribault, MN, USA [17]](/images/images/reliantaluminum/janispaper/8.jpg) Faribault Armory, Faribault, MN, USA [17]
Faribault Armory, Faribault, MN, USA [17]
Performance: Field Review of the Biomedical Research Centre Seltersberg, Giessen, Germany
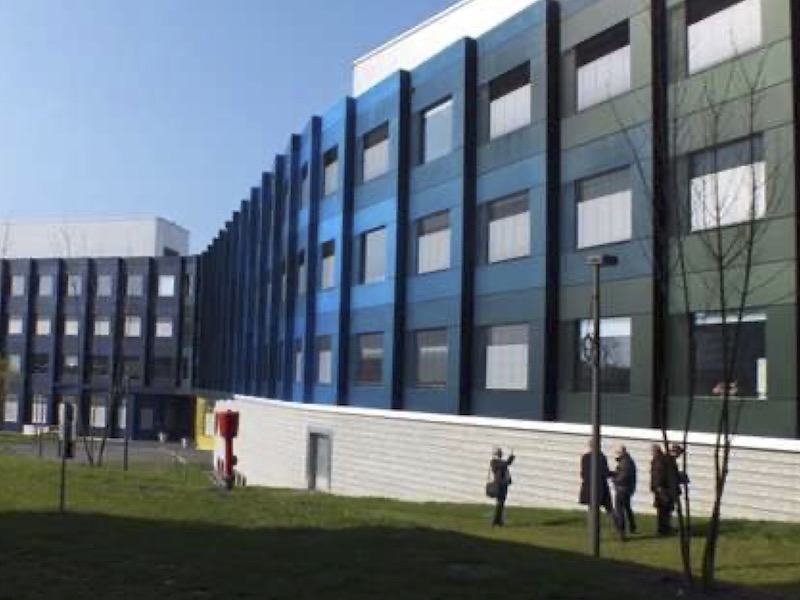
The Biomedical Research Centre Seltersberg located at the Justus Liebig University in Giessen, Germany was completed in 2010 and utilized multiple gradations of color in olive yellow, gold, orange, red, blue, turquoise and green. On March 28, 2014, a team was dispatched to the building to investigate possible color fading. Olive yellow, red, blue and turquoise did not appear to exhibit any significant color loss.
Orange, green and gold were investigated. Color measurements were performed with a Minolta CR-400 (serial number B 8211632) calibrated with white plate 16733050 except for the light and dark gold samples [18].
 Dark blue, light blue and green gradations
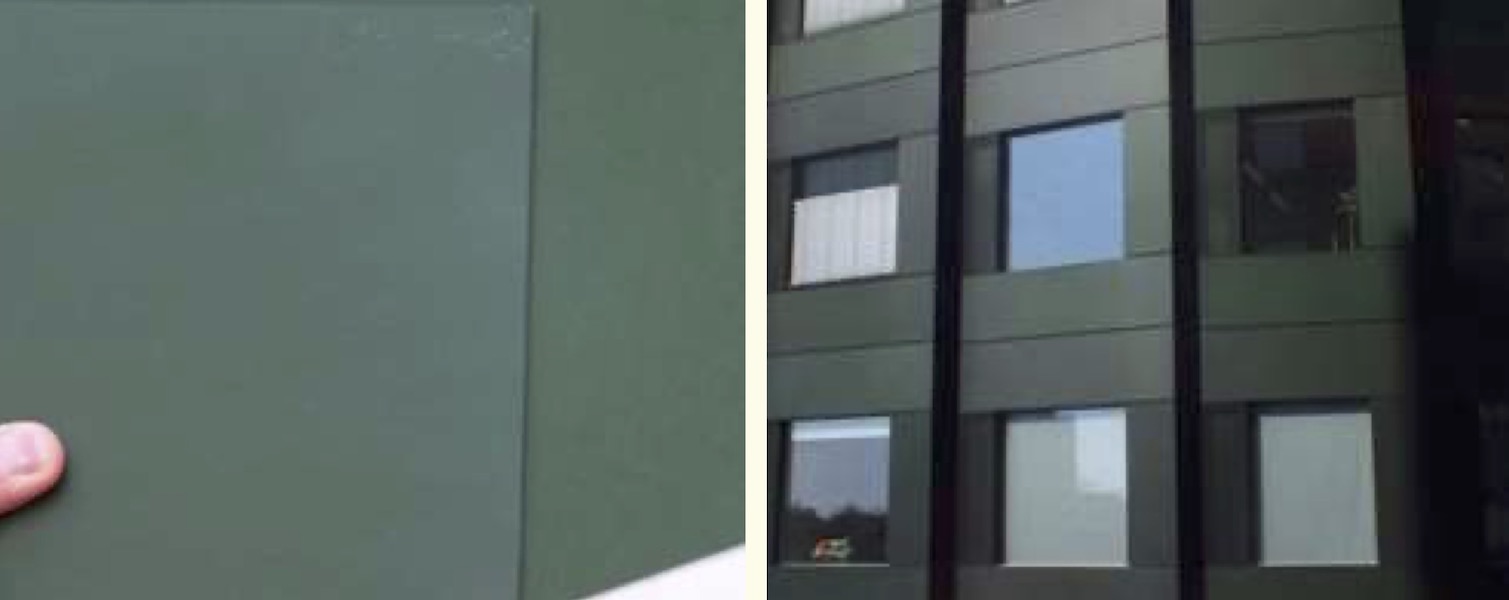 Green gradations (area of potential concern)
The green panels were observed to exhibit the least amount of color gradations. All of the panels of concern were a dark green, so a “light” panel was chosen on the east and north side. The color was measured and compared to an unexposed retained sample. Results are below.
| L | a | b | |
| Retain | 27.5. | -8.8 | 6.1. |
| South | 27.0 | -7.6 | 5.3 |
| North | 27.3 | -8.3 | 6.1 |
Resulting color change as compared to the unexposed retained samples are a ΔE of 1.5 for the south panel and 0.5 for the north panel. Though the panels have experienced some color change, the amount at this time is not over the 5 ΔE limit that AAMA 611 would impose. The retain sample is 1.1 ΔE from the Sandalor standard (L 27.3, a -7.9, b 5.5). Panels on the building have a lower overall color change as compared to this standard with a ΔE of 0.5 for the south panel and 0.7 for the north panel.
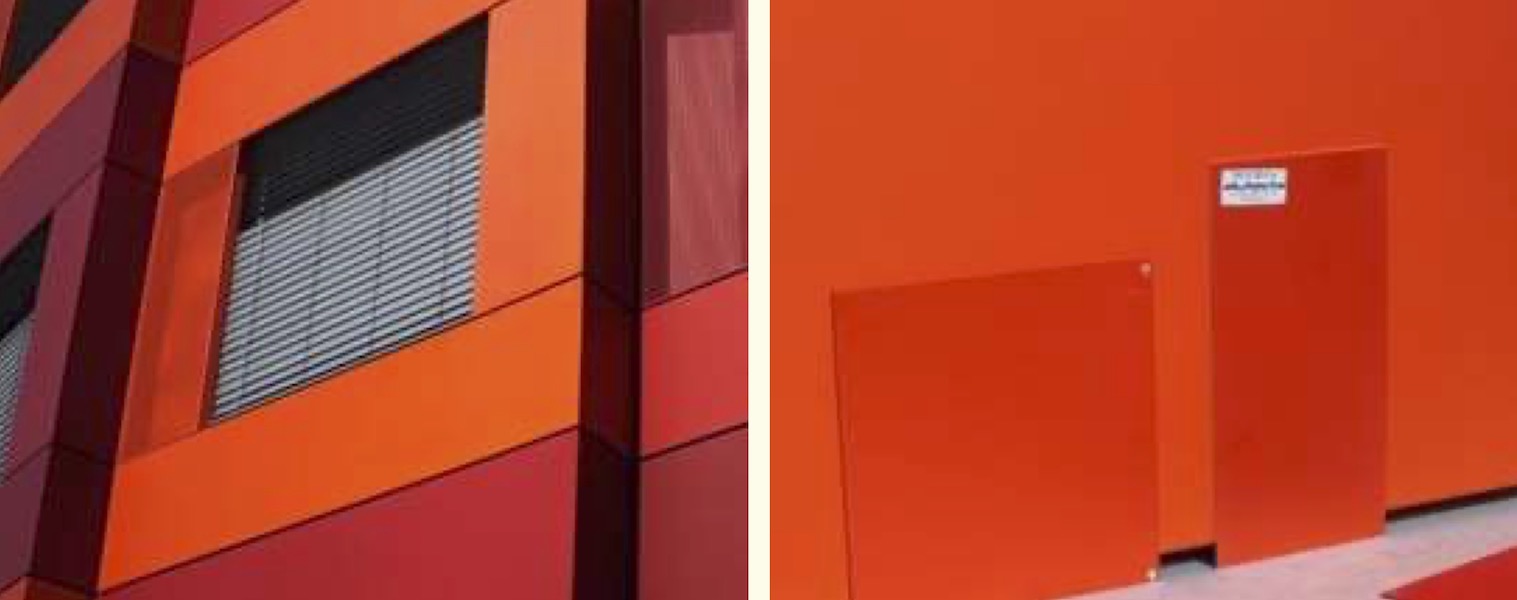 Orange gradations (area of potential concern)
The orange panels were observed to appear very strong and homogenous. Compared to the reference samples, they were observed to have lost little strength. The color measurements indicate very little change in brightness (L), but some change in b values indicating potential color loss compared to the unexposed retain panels. However, to the observer’s eye there appears to be no color change. Values are below:
L a b
Retain 52.1 50.7 47.1
South 52.4 48.6 50.9
East 51.6 49.7 50.4
Resulting color change as compared to the unexposed retained samples are a ΔE of 4.4 for the south panel and 3.5 for the east panel. Though the panels have experienced some color change, the amount at this time is not over the 5 ΔE limit that AAMA 611 would impose. The retain sample is 2.8 ΔE from the Sandalor standard (L 53.0, a 50.9, b 49.7). Though this is likely within an acceptable sample range, it may be a factor in the greater measured color change than the green panels. Panels on the building have less color change as compared to this standard with a ΔE of 2.7 for the south panel and 2.0 for the east panel. This may also explain why the observed color does not appear to have changed.
The gold panels were also measured. The gold panels are of interest because the iron oxalates used to produce gold colors have been used for many decades in architectural applications. The weather and light fastness properties have been accepted as sufficiently adequate. A comparison of the other dyes performance to this color is thereby of interest as iron oxalate gold sets the bar. Unfortunately, an unexposed retain was not maintained (likely because of the widespread acceptance). The building panels will be compared to the general standards.
The observation of the panels on the building was that the color looked flawless. However, the color measurements indicate some shifting may have taken place. Without the retains, the evaluation must be somewhat tempered, though the organic dyed panels seem to have outperformed the inorganic dyed panels. Readings were taken from light and dark gold panels were taken from the south and west.
| Lt. Gold. | L | a | b |
| Retain | 70.5. | 11.3. | 60.6. |
| South | 67.4 | 7.7 | 57.2 |
| West | 68.6 | 7.5 | 57.4 |
| Dk. Gold | |||
| Retain | 61.7 | 9.8 | 49.8 |
| South | 63.0 | 6.3 | 44.1 |
| West | 63.5 | 6.1 | 44.1 |
Resulting color change for the light gold panels as compared to the light gold sample are a ΔE of 5.8 for the south panel and 5.3 for the west panel. Resulting color change for the dark gold panel as compared to the dark gold sample are a ΔE of 6.8 for the south panel and 7.0 for the west panel. Without a retain for comparison, it is unclear if the high ΔE is a product of color loss or color deviation from the standard in the anodize process.
Conclusion
Adherance to specific parameters in the anodize process is required for high performing light fastness properties. Proper dye selection to achieve the desired color with the requisite light fastness properties is the first step. The second step is attention to procuring quality metal. The third step is to employ the best practices in racking, ensuring adequate contact of the part to the rack, the rack to the flight bar and the flight bar to the electrical contacts in the anodize tanks and electrolytic tanks. The fourth step is to ensure complete removal of oils and dirts in the cleaning process. The fifth step is uniform surface preparation in producing either a matte or glossy finish. The sixth step is to ensure complete surface preparation by removing any remaining intermetallics and oxides. The seventh step is proper anodizing. The eight step is uniform electrolytic color for either two-step coloring or overdyeing. The ninth step is maintaining the dye bath to ensure sufficent adsorption of dye pursuant to requirements in order to achieve a light fast color. The final step is complete sealing.
It is completely feasible to create an anodize process can be that affords an anodizer the opportunity to extend a larger color pallette offering to the end user in areas that require high light fastness properties. Buildings using non standard earth tones have been produced for many decades throughout Europe and the United States. Blue, turquoise, red, green, orange and gold are color options. Used in conjunction with electrolytic coloring, the overdying process offers more colors and greater light fastness potentials. Offering more color options to end users will undoubtedly aid in expanding the market share of anodized aluminum and prevent market share loss to other coating options.
Kevin D. Janis, J.D. is the Business Development Manager at Reliant Aluminum Products. This paper as presented at the 2021 Aluminum Anodizers Council conference.
References
- Jester, Thomas C. Aluminum Finishes in Postwar Architecture. April 20, 2016, www.docomomo-us.org/news/aluminum-finishes-in-postwar-architecture, accessed August 1, 2021.
- Fenestration and Glazing Alliance. AAMA-611-20: Voluntary Specifications for Anodized Architectural Aluminum. December, 2020.
- Variations in Colour: Sanodal. p. 7.
- International Standard. ISO 2135: Anodizing of aluminum and its alloys – Accelerated test of light fastness of coloured anodic oxide coatings using artificial light. February 1, 1984.
- Variations in Colour: Sanodal. p. 10.
- Variations in Colour: Sanodal. pp. 10-11.
- Variations in Colour: Sanodal. p. 20.
- Variations in Colour: Sanodal. p. 21.
- Variations in Colour: Sanodal. p. 22.
- Variations in Colour: Sanodal.pp. 17-20
- Variations in Colour: Sanodal. p. 8
- ASTM International. ASTM B-680-80. 2019
- Fenestration and Glazing Alliance. AAMA-611-20: Voluntary Specifications for Anodized Architectural Aluminum. December, 2020.
- ASTM International. ASTM B117-19. 2019.
- Author unknown. Anodised aluminium building parts dyed with Sandolar. August 1984.
- Photos publicly available. www.sandolar.com/referenzen_en.html. Accessed August 1, 2021.
- Photos courtesy of Aacron, Inc, Minneapolis, MN, USA.
- Heber, Thomas. Field Report: Besichtigung Uni Gebäude in Giessen. March 28, 2014.