The market for fastening parts is increasingly demanding high-strength materials, and special attention must be paid to possible hydrogen embrittlement when electroplating them.
Because with increasing material strength, the risk of hydrogen-induced brittle fracture also increases. The test methods used so far require test cycles of several days. That is why Dr.-Ing. Max Schlötter GmbH & Co. KG — together with iChemAnalytics — has developed a test rig that reduces testing time to just a few minutes.
For the first time, up to 20 items of C-test specimens can be tested simultaneously in just 180 seconds. It is based on a mechanical load test where force-displacement curves are recorded. The individual measuring cells are provided with specifically parameterisable measuring programs that can be called up in parallel. Thanks to the high-resolution force sensors and very precise measurement curves, high-quality characteristic values can be reproductively generated and used as a basis to further develop in-house processes and products. This enabled Schlötter to redevelop the Slotoclean BEF 1790 pickling degreaser.
The material properties of high-strength steels are increasingly being optimized to become lighter and more resistant, for example. Cathodic corrosion protection applied by electroplating is often used to give these steels the best protection against corrosion.
 Dr. Michael Zöllinger“A pickling step must be carried out during the pre-treatment of the component to achieve the best possible adhesion of the coating,” says Dr. Michael Zöllinger, one of the managing directors of the long-established family-owned company Dr.-Ing. Max Schlötter.
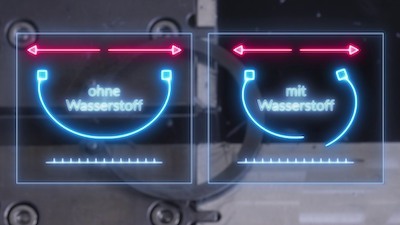
Oxides and scales are removed in the process, resulting in a metallically flawless surface for the subsequent coating process. Suppose the acid used in pickling attacks the base material; hydrogen is also produced in atomic form. Physical processes can cause parts of this hydrogen to recombine to form non-diffusible molecular hydrogen on the surface or diffuse into the material. The storage of atomic hydrogen weakens the metal lattice. Depending on the alloy, the component can eventually become brittle, and, in the worst case, this stressed state can lead to what is known as brittle fracture.
“The pre-treatment and subsequent coating of higher-strength steel components with a tensile strength greater than 800 MPa therefore repeatedly poses the question to both specialist companies and users of how high the maximum hydrogen concentration in the component may be for material damage to be avoided. To date, despite numerous scientific papers, no user-friendly in-process testing methods have become established for the user in practice; any such methods are time-consuming and complicated,” says Zöllinger.
For this reason, Dr.-Ing. Max Schlötter GmbH & Co. KG, together with iChemAnalytics, has developed a new practical test rig that enables versatile C-body testing compliant with the latest standards in a fraction of the time otherwise required. The WSRME TWIN precision measuring device uses C-ring samples to detect changes in the material condition that can occur, for example, due to liquid metal-induced hardness, tempering, or hydrogen embrittlement.
Comparable tests used to take several days. But thanks to the special design and precise testing concept, this now takes only two to three minutes. This enables process manufacturers and contract coaters to independently integrate standard-compliant work as well as genuine process monitoring and quality assurance into their own production without having to rely on external testing service providers.
In-Process Testing of Up to 20 C-Rings
 The WSRME TWIN precision measuring device uses C-ring samples to detect changes in the material condition that can occur, for example, due to tempering, hydrogen or liquid metal-induced embrittlement.The inconspicuous structure contains two test field openings as well as several electric drives with adjustable feeds to precisely implement the desired load levels of the test procedures. Depending on the variant, up to 10 measuring cells can be equipped with a maximum of 20 C-rings, which can be measured in parallel and independently of each other.
Depending on the requirements, test specimens individually tailored to components or processes can also be manufactured and used. Various load and positioning options are simultaneously available to the operator – from force- or distance-controlled stepwise loading to defined holding times with subsequent lifting at a constant stretch rate. This saves a lot of time that would otherwise be needed for testing in a row. In the course of this, certain characteristic values are automatically determined and monitored, which result from the freely selectable measuring methods. At the same time, high-resolution force sensors and precise displacement measurement ensure optimum data quality.
“The selection and monitoring of the test procedures is very simple: all settings can be made and applied via the integrated multi-touch display,” says Zöllinger.
 Thomas HaberfellnerThanks to the integrated evaluation algorithms, which are controlled by a powerful microprocessor, the measuring device is able to measure or calculate a multitude of material-specific characteristic values such as the transition from elastic and plastic material behavior, the hydrogen-induced material deconsolidation as well as a material-specific deformation index (DI) for the process. The measurement and characteristic values generated in the process are automatically linked and stored with the other metadata, such as pre-treatments and material conditions.
“A high statistical significance is achieved by parallel testing on several measuring stations at the same time. This allows valuable conclusions to be drawn about how the component quality or the composition of the starting steel can be improved for machining alone,” says Thomas Haberfellner, head of the Chemistry and Development of New Markets Business Unit at Max Schlötter.
Test Rig Provides Data Basis for Process Development
 Thanks to the integrated evaluation algorithms, which are controlled by a powerful microprocessor, the measuring device is able to measure or calculate a multitude of material-specific characteristic values such as the transition from elastic and plastic material behaviour, the hydrogen-induced material deconsolidation as well as a material-specific deformation index (DI) for the process.All measured values are stored in a database and can be imported into programs such as Microsoft Excel. These results can help customer-specific products be developed or the existing portfolio optimized, such as the additions to coating baths (e.g., for electroplating) or new “bath additives” (e.g., pickling inhibitors).
Max Schlötter is already successfully using the test rig for this purpose in its own research and development. The results that are quickly accessible with the new measuring technology made it possible to develop the in-house Slotoclean BEF 1790 pickling degreaser, which has a new generation of inhibitors. These not only maximize the inhibition value but also minimize the process-related tendency to hydrogen embrittlement while more than tripling the service life of the pickle compared to the first-generation systems. This makes an active contribution to conserving resources and reduces the CO2 footprint in contract electroplating.
“The WSRME TWIN precision measuring device not only makes in-process testing for hydrogen embrittlement easily accessible to every manufacturer and contract coater. The versatile parameter recording and automated evaluation also help to reduce process costs in the long term through targeted material selection, the optimization of heat treatment parameters, and the use of chemicals in line with requirements,” says Zöllinger.
Dr.-Ing. Max Schlötter GmbH & Co. KG is a fourth-generation family business with over 110 years of experience in research and development. Founded as an electrochemical laboratory, the company is now one of the leading specialist firms for electroplating. Schlötter is active worldwide with locations in Geislingen (Germany), Pershore (UK), Naas (Ireland), Norrköping (Sweden), Singapore, Wuxi and Dongguan (China). Their core competencies are the development of electroplating processes, the production of process chemicals, and the construction of electroplating plants. Around 200 people are currently employed at the Geislingen headquarters.
For further information, visit www.schloetter.de


