This paper discusses recent research work on the development of a functional trivalent chromium plating process from a trivalent-based electrolyte to replace hexavalent chromium plating.
Hexavalent chromium plating has been used for many years to provide hard, durable coatings with excellent wear and corrosion resistance properties. However, hexavalent chromium baths have come under increasing scrutiny due to the toxic nature of the bath, effects on the environment and workers’ health.
In this paper are results from our development program aimed at achieving properties comparable to existing hexavalent chromium plating for functional applications. Specifically, recent efforts in plating chromium on the internal surfaces of cylindrical parts will be presented, as well as wear test data.
Introduction
Our work continues to address the need for a drop-in replacement chromium plating process that can coat complex, hard-to- access surfaces such as the interior of landing gear, using an environmentally benign trivalent chromium bath. We have developed a green manufacturing process** that meets the stated EPA needs by improving an existing process while utilizing a novel green approach that eliminates worker exposure to the carcinogenic hexavalent chromium bath. The USEPA identified hexavalent chromium as one of 17 "high-priority" toxic chemicals based on their known health and environmental effects, production volume and potential for worker exposure1 which were targeted for 50% reduction by 1995.2 The urgency of this issue was further underscored by a recent memorandum from the Under Secretary of Defense, referring to the need to minimize or eliminate the use of hexavalent chromium as an “extraordinary situation,” requiring the government and industry to “go beyond established hazardous materials management processes” and “more aggressively mitigate the unique risks to operations now posed by hexavalent chromium.”
Current wear resistant coating solutions include alternative technologies like high velocity oxyfuel (HVOF) or new platable material systems such as cobalt-phosphorus alloys. HVOF technology is limited by the geometry of the part, requiring that the regions that need to be coated are non-complex and be located within line-of-sight to the spray head. Additionally, HVOF systems are extremely expensive to implement at industrial and governmental depot facilities. As for new platable material systems, they require the use of potentially toxic materials including nickel and cobalt,3 which can create manufacturing and environmental problems due the need for new process specification sheets and environmental exposure initiatives. The advantage of our approach is centered on developing a drop-in replacement using an environmentally benign trivalent chromium electrolyte and controlling the deposition process through use of sophisticated waveforms engineered to deliver the desired chromium coating properties rather than the use of novel material systems or carcinogenic hexavalent chromium plating technologies. Additional advantages to the additive-free trivalent chromium plating process relative to hexavalent chromium plating include:
- Trivalent chromium is non-toxic, non-hazardous and is not an oxidizer. Therefore, meeting air quality regulations is easier and working conditions are greatly improved. The exposure limit for trivalent chromium is an order of magnitude higher than that of hexavalent chromium.
- Disposal costs are significantly reduced for trivalent chromium plating. Hydroxide sludge generation is reduced ten to twenty times because trivalent chromium generally operates at a chromium content of about 4-20 g/L vs. 150-300 g/L for a hexavalent bath.
- As there are no proprietary additives in the trivalent bath, the rinse water may be recycled.
In addition, trivalent chromium plating has the following technical advantages:
- The trivalent chromium-plating bath is not sensitive to current interruptions.4 Therefore, the innovative approach used in this program is more suitable for trivalent chromium plating than for hexavalent chromium plating.
- Drag-in of chloride and sulfate from previous nickel-plating operations into the trivalent chromium process is tolerated.5 By contrast, chloride and sulfate drag-in upset the catalyst balance in a hexavalent process.
- Throwing power for trivalent chromium plating, which is poor in a hexavalent chromium bath, is good and similar to other metals such as copper.5
Therefore, trivalent chromium plating has numerous environmental, health and technical advantages relative to hexavalent plating. Faraday is uniquely positioned to undertake the development of trivalent chromium plating for the applications stated above due to its years of experience with the science of applying pulse and pulse reverse waveforms to the electrodeposition of functional and decorative chromium coatings. For example, with prior funding from the USEPA SBIR program, Faraday demonstrated the feasibility of thick, hard functional chromium deposition from a trivalent chromium plating bath onto the exterior surface of rods and coupons (Contract #68D50116), and then built upon that work to develop a cost-competitive plating bath for those parts (Contract #68D00274). In a current program with the National Center for Manufacturing Sciences (NCMS - Contract #140427), we are validating our electrochemical process for simple line-of-sight applications by depositing a chromium coating onto flat coupons that passes the accepted functional property standards set by the aerospace community, including adhesion, hardness and porosity. To date, Faraday has demonstrated that the chromium coatings prepared using our process have functional properties equivalent to the coatings produced with a hexavalent chromium bath (Table 1). These data demonstrate equivalent or superior: (1) plating rate, (2) Knoop hardness, (3) current efficiency, (4) hydrogen embrittlement behavior, (5) adhesion, (6) corrosion resistance, (7) porosity, (8) thickness, (9) Taber Abrasion, Ball on Flat Reciprocating and Dithering wear resistance and (10) no hexavalent chromium formation over a 1400 A-hr processing window.
These data demonstrate the feasibility of the process and provide the basis for further technical qualification and prototype design. The primary hurdle being discussed in this paper is the demonstration and development of our chromium electrodeposition process for hard to access, complex shapes, such as the interior of cylindrical shafts.
Technical Approach
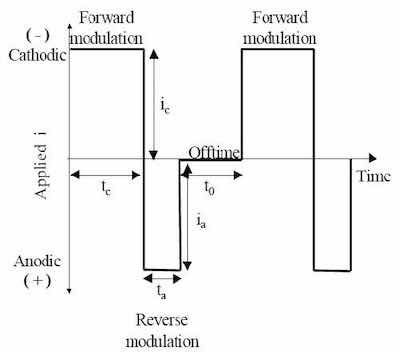 Figure 1 - Generic pulse / pulse reverse waveform.Our chromium plating process utilizes pulse and pulse reverse waveforms for trivalent chromium plating. Figure 1 is an example of such a waveform, consisting of a cathodic (forward) pulse followed by an anodic (reverse) pulse and a relaxation period (off- time). The cathodic peak current (ic), cathodic on-time (tc), anodic peak current (ia), anodic on-time (ta), and the relaxation-time (to) are individual variables for process control. The sum of the cathodic on-time, anodic on-time and relaxation-time is the period of the modulation and the inverse of the period is the frequency. The cathodic duty cycle (γc) is the ratio of the cathodic on-time to the period, and the ratio of the anodic on-time to the period is the anodic duty cycle (γa). The frequency and duty cycles are additional variables for process control. The average current density (iaver) or electrodeposition rate is given by:
Iaver = icyc - iaya
Table 1 - Physical property comparison between chromium deposits produced from a current hexavalent chromium process and the Faraday trivalent chromium process.
| Characterization test (per Standard) | Faraday’s Trivalent Chromium Plating |
| Thickness (per AMS 2460 3.4.1) | Comparable to hexavalent chromium plating. |
| Knoop hardness (per AMS 2460 3.4.3) | Comparable or superior performance to hexavalent chromium plating (800-1000 KHN; average 947 KHN) |
| Hydrogen embrittlement (per ASTM F519 1a.1) | Comparable performance to hexavalent chromium plating. |
| Porosity (per AMS 2460 3.4.4) | Comparable performance to hexavalent chromium plating. |
| Adhesion (per ASTM B 571) | Comparable performance to a baked hexavalent chromium deposit. |
| Corrosion resistance (ASTM B117) | Comparable performance to a baked hexavalent chromium deposit. |
| Plating rate | 3.5 mil/hr compared to 1 mil/hr. |
| Current efficiency | 42% compared to 15% for hexavalent chromium plating. |
| Hexavalent chromium formation | After 1400 A-hr no observed Cr+6 formation. |
| Taber abrasion test (ASTM D4060) | Comparable performance to a baked hexavalent chromium deposit. |
| Reciprocating ball-on-flat (ASTM G133) | Comparable performance to a baked hexavalent chromium deposit. |
| Oscillation (Dithering wear test) | Comparable performance to a baked hexavalent chromium deposit. |
Just as there are infinite combinations of height, width and length to obtain a given volume, in pulse reverse processes there are unlimited combinations of peak current densities, duty cycles and frequencies to obtain a given electrodeposition rate. By controlling the cathodic and anodic on-time, relaxation-time and the cathodic and anodic peak currents, precise control of the electrodeposition process is achieved and the properties of the resulting deposit may be controlled or fine-tuned for a specific application. In conventional direct current (DC) electrodeposition, the current is turned on and held for the duration of the process. By interrupting this constant stream of current, as in the our process, one may achieve results not possible with conventional DC electroplating, such as deposit property control, and elimination of adverse side reactions such as hydrogen evolution.
Results and Discussion
Cell Design
Faraday has designed and built a cell (Fig. 2) to coat the internal diameter (ID) of 4130 steel pipes (i.e., 11⁄2 in. and 3 in. ID) with varying lengths. The cell was designed to mimic an in-service hexavalent chromium plating cell. Fresh trivalent chromium solution flows into the bottom of the fixture and up through the base of the 4130 pipe. The solution flows through the interior of the pipe in an ideally laminar fashion before exiting from the top of the pipe where it is then mixed back with the bulk electrolyte. Two pumps maintain a constant flow throughout the process, while an electrolyte heater maintains the electrolyte temperature at 54°C (130°F) during processing.
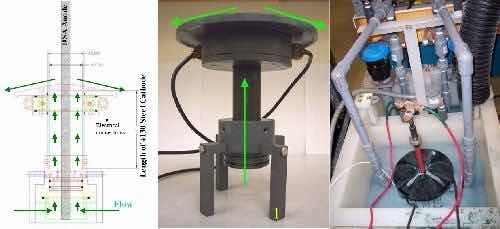 Figure 2 - (Left) CAD drawing of the trivalent chromium plating cell, green arrows show the flow of chromium solution; (center) mounting assembly; (right) working cell.
Future designs will include electronic flow meters to quantify the flow rate, giving better process reproducibility, and standoffs at the top and bottom of the pipe to reduce flow entry and exit turbulence effects.
Surface Pretreatment
We plated the interior surfaces of 11⁄2 in. and 3 in. 4130 steel pipes, cut into 4, 6 and 8-in. samples. The plating electrolyte was a chromium sulfate-based bath. The inner and outer surfaces of the as-received 4130 steel pipes were covered in grease and a thick black oxide layer that, without adequate surface pretreatment, prevented chromium from depositing on the surface.
A cleaning procedure was developed to produce a surface on which chromium could be electrodeposited, by adopting the standard surface pretreatment techniques used in industry. The following steps were used to produce a platable surface:
- Acetone dip for at least 15 hr. This step was used to remove the grease from the surface of the as-received pipes.
- 67 vol% HCl dip for at least 15 hr. This step partially removed the oxide from the surface and decreased the subsequent grit blasting and honing surface preparation times.
- Grit blast with 220 grit. Grit blasting removed the remaining oxide from the surface.
- Hone cleaning with 220 grit. This step was used to assure that all of the oxide was removed and the surface was as defect-free as possible. It also helped in smoothing the inner surface.
- Anodic clean for 2 min at 9 A/dm2. This alkyl-cleaning step was used to remove any additional organic oils and grease from the surface.
- 67 vol% HCl dip for 15 min. Remove oxide that had formed between the prior steps. The sample was then immediately rinsed and put into the chromium plating solution.
For the flat 4130 panels that were plated with trivalent chromium for wear testing, the substrate surface of each panel was prepared for deposition by:
- Acetone rinse. Rinsing with acetone removed grease from the surface.
- Grit blast with 220 grit. Grit blasting removed the remaining oxide from the surface.
- Pumice scrub. The surface was scrubbed with a scotch bright and chlorine-free pumice.
- Water film. A thin water film was maintained on the surface until the part was installed into the plating electrolyte.
- Hot entry. The part was placed in the electrolyte with an applied overpotential of 2 V. The hot entry was used to eliminate the possibility of the surface partially oxidizing prior to the onset of the deposition process. The use of an applied overpotential of 2 V does not initiate the chromium deposition. It serves only to reduce any partially oxidized species and further clean the surface.
Hull Cell Studies to Determine Current Density Ranges
Figure 3 shows a Hull cell panel plated with a chromium coating from a trivalent bath. The marked shiny gray region represents an area in which the chromium coating is visually well plated. This represents the visual structure texture that is desired on the interior surface of the 4130 steel pipes. The region left of the marked area shows a black coloration, representing a burnt chromium deposit, and the region to the right shows a brown coating that represents no deposit. Figure 4 shows the internal surface of 11⁄2 in. ID, 4 in. long 4130 steel pipes that were coated with chromium at various current densities. The optimum current density range was between 32-35 A/dm2 (2.1-2.3 A/in2) based on a visual evaluation comparable to the marked region in Fig. 3. Current densities lower than 32 A/dm2 produced a visually more non-uniform chromium coating, while current densities greater than 35 A/dm2 produced a visually more burnt texture.
 Figure 3 - A Hull Cell panel showing the range of current densities for which chromium can be plated along the panel. The region marked by the red dotted lines shows the ideal chromium coating operating range.
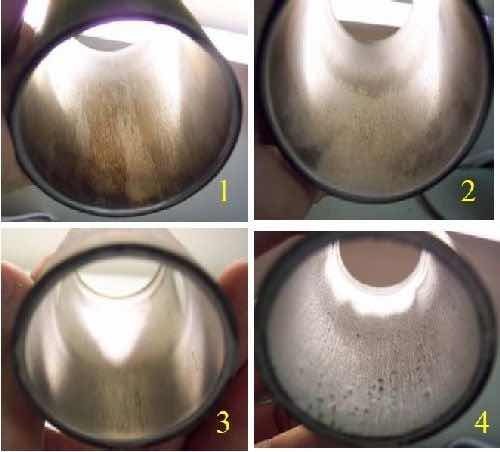 Figure 4 - 11⁄2 in. ID × 4 in. pipes coated with chromium using DC processing to optimize plating current density: (1) 28 A/dm2, (2) 32 A/dm2, (3) 35 A/dm2, (4) 40 A/dm2. Photographs 2 and 3 closely match the coating quality marked in Fig. 3.
Process Tests
A wide range of tests were performed to understand the various effects of our trivalent chromium plating process, and to optimize the processing window to produce the desired chromium coating. All initial tests were performed on 11⁄2 in. ID pipes 4 in. long. Process parameters were evaluated to study the effect of frequency and duty cycle on the visual uniformity of the chromium plate. An optimized set of processing parameters was used to demonstrate the scalability and robustness of our process on larger diameters and lengths.
Figure 5 gives an example of the results obtained, showing chromium deposited on the interior surface of a 4130 steel pipe. The chromium coating produced using DC had a dull, hazy finish along the length of the pipe. As the frequency of the waveform increased from 20 to 1000 Hz, this finish brightened to a more ideal chromium finish. A possible explanation for the observed uniformity difference between the chromium coating prepared using DC and low-frequency PC waveforms versus high-frequency PC processing conditions could be related to the depletion of the Cr+3 ion concentration near the plated surface. At the higher frequencies, the effective boundary layer thickness is smaller, such that the Cr+3 ions from the bulk solution are closer to the surface, and therefore more readily available for deposition. However, other mechanistic considerations may explain the observed phenomena, such as a decrease in the grain size of the deposit with increasing waveform frequency.
 Figure 5 - Processing condition frequency optimization study: 11⁄2 in. ID × 4 in. long pipes coated with chromium at a current density of 35 A/dm2 and the frequency increasing from left (DC) to right (1000 Hz).
Process Scalability
In order to demonstrate scalability, the best processing parameters from the initial studies were used to evaluate the effect of changing the diameter and length of the steel pipe. Figure 6 shows the deposited chromium coating on the internal diameter of pipes with various dimensions, for the same set of processing conditions, demonstrating the potential of our trivalent chromium plating process to produce a visually uniform and ideal chromium coating along the length of the pipe, regardless of the dimensions.
 Figure 6 - Process scalability study: 4130 steel pipes coated with chromium at IDs/lengths of (a) 11⁄2 × 6 in., (b) 11⁄2 × 8 in., (c) 3 × 6 in. and (d) 3 × 8 in.
The same anode was used for the 11⁄2 in. and 3 in. IDs. Thus the gap and the active area ratio for the anode and cathode were variable. Increasing the diameter of the pipe increased the gap between the anode and cathode while also increasing the total active area of the cathode, thus creating a factor that could affect the deposition process. The results shown in Fig. 6 demonstrate the ability of our process to maintain a uniform chromium deposit, independent of anode-to-cathode gap and relative cathode area, demonstrating process robustness. This will increase the likelihood of success when transitioning to a wider range of part configurations and sizes.
Characterization of coating properties and wear resistance
The samples underwent a hydrogen stress relief bake at 190°C (375°F) for 24 hr of post-plating, before performing the analysis tests. This bake is standard practice in the chromium plating industry. Characterization included a microstructural analysis of the coating cross section, and an evaluation of the physical properties (hardness, porosity, adhesion, wear resistance) of the coating.
Thickness and microstructural uniformity of the coating
Figure 7 shows the microstructure of the chromium coating produced on a 11⁄2 in. ID pipe with a 6 in. length, with respect to position in the pipe. The microstructure of the coating at the top of the pipe (Fig. 7a) is structurally equivalent to coatings obtained from conventional hexavalent chromium plating processes (Fig. 8). Note that each chromium coating from Fig. 8 shows a dense coating with small micro-cracks. These shallow cracks have been shown to allow the coating to have lower internal stresses, higher lubricity and better wear and corrosion resistance. The microstructure observed in Fig. 7b (middle) has the potential to be sufficiently wear resistant, though the non-uniform deposit on the top of the coating could be a cause for concern. Figure 7c (flow entry) demonstrates a coating with large thru-cracks that may impair the coating wear resistance. This growth behavior is speculated to be a result of electrolyte turbulence at the inlet, and should be readily solvable using cell modifications commonly used in industry.
Modifications to the holder design are currently being done to reduce flow turbulence at the pipe inlet, with the goal of producing a uniform coating, similar to the one observed in Fig. 7a, along the full length of the pipe.
 Figure 7 - Cross-section image of the high frequency PC waveform on a 11⁄2 in. ID pipe with a 6 in. length, (a) 1 in. from the flow exit, (b) at the pipe centerline and (c) 1 in. from the flow entrance.
 Figure 8 - Head-to-head comparison between our trivalent chromium coating and the chromium coating produced by the conventional hexavalent chromium plating process.
AMS 2460 standard
The Aerospace Material Specification (AMS) 2460 standard is used to determine if a chromium coating is acceptable for use in wear applications within the aerospace community. Several AMS 2460 protocols were used to determine if the physical properties of our trivalent chromium coating had the potential to meet or surpass the properties of a conventional hexavalent chromium coating. We performed (1) the ferrocyanide porosity test (AMS 2460: Section 3.4.4.2), (2) bend to break adhesion (AMS 2460: Section 3.4.2 per ASTM B571), (3) a Knoop hardness test (AMS 2460: Section 3.4.3 per ASTM E384), and a number of wear tests including Taber abrasion (ASTM D4060), ball-on-disc (ASTM G133) and oscillation/dithering wear.
Porosity: The ferrocyanide porosity test is used to identify cracks in the chromium coating that penetrate to the substrate. The test is conducted by saturating white filter paper with a ferrocyanide solution, and placing the paper on top of the chromium coating. If the coating has cracks that penetrate through to the steel substrate, the iron at the base of the cracks will activate the ferrocyanide solution and Fe+2 will form, causing blue spots to form on the filter paper. To pass this test the filter paper must have less than 15 blue dots per square inch, with no dots larger than 0.8 mm (0.03 in.). Figure 9 shows the deposited chromium on a 4 × 4 in. panel and the filter paper test strip from the successful ferrocyanide test, with a limited number of blue dots around the coating edge, where the basis steel was likely to be exposed, and very few in the center.
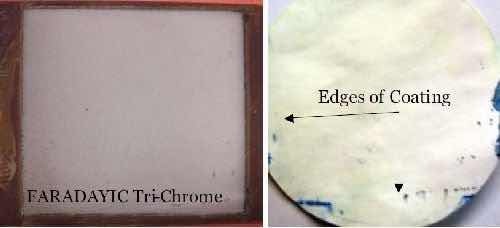 Figure 9 - Ferrocyanide test results for our trivalent chromium coating.
Adhesion: Figure 10 shows chromium coated coupons that were placed in a vise and bent back and forth until they broke at the midpoint of the coupon, as per AMS 2460. To pass this very aggressive test, the chromium coating must remain intact and adhere to the substrate at the break point, without peeling or spalling from the surface. Figure 10 shows that the trivalent chromium plating process produces a coating that passes this test, performing as well as a coating deposited using the conventional hexavalent process.
Hardness: The desired range of hardness for a hexavalent chromium coating is 800 to 1300 KHN. The data point for the hexavalent chromium used for comparison in this program was 887 KHN. The trivalent chromium coating had a measured Knoop hardness of 947 KHN, which is within the desired range, and exceeds that of the hexavalent chromium coating used for comparison.
Wear resistance
Taber abrasion wear resistance: Under funding from the National Center for Manufacturing Sciences, we have demonstrated performance equivalent to hexavalent chromium coatings for the Taber abrasion test, an industry standard test for wear resistance. Figure 11 shows the cross-section and micro-hardness value for the Taber Abrasion test sample, with the wear test results documented in Fig. 12 and compared to a conventional hexavalent chromium coating, prepared by Fountain Plating. The assessment of the Boeing engineers who conducted the test is that the Faraday trivalent chromium plate performed as well as the hexavalent chromium plate. The wear index number of 3.01 was greater than that of the conventional hexavalent chrome plate at 1.43. This is believed to be due to coating edge spall on the trivalent chromium coated test panel, which was slightly smaller than the size required for the test. This separation of the trivalent coating near the edge of the plate did not appear to affect the wear resistance of the coating over the bulk of the panel. Larger trivalent chromium plated panels are currently being prepared to verify the equivalent wear resistance of the trivalent chromium plate as compared to hexavalent chromium.
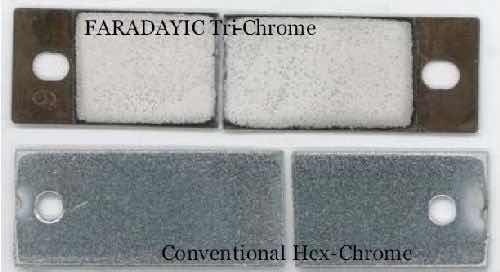 Figure 10 - Bend-to-break adhesion test results per AMS 2460, showing a direct comparison between the adhesion of trivalent chromium coating and a conventional hexavalent chromium coating.
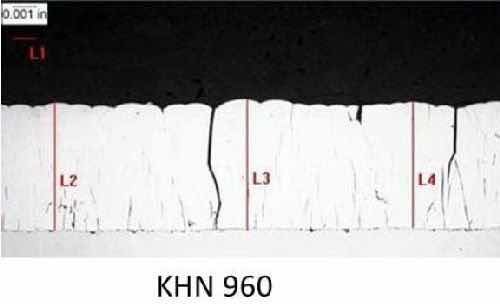 Figure 11 - Cross-section of the trivalent chromium Taber abrasion test sample and microhardness.
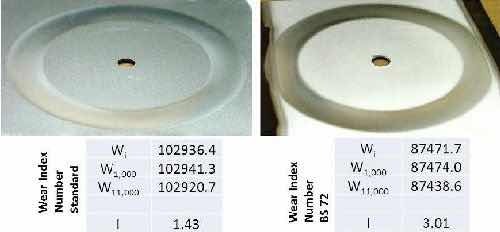 Figure 12 - Comparison of wear index numbers and Taber abrasion results for (left) hexavalent and (right) trivalent chromium plated samples.
Ball-on-flat reciprocating and dithering wear resistance: Additional coated panels were evaluated by United Technologies Research Center (UTRC) using their standardized dithering wear and reciprocating ball-on-flat tests. Both tests are based on the primary premise of inducing surface abrasion and fatigue. The reciprocating ball-on-flat test utilizes a 0.25 in. diameter ball sliding against a flat sample per ASTM G133. UTRC tested balls made from M-50 and an alumina ball for both reciprocating and dithering ball-on-flat tests. Three different test loads were implemented allowing for load sensitivity of the plating materials as well as ball material sensitivity. The tests were conducted for 5000 cycles with a stroke length of 6 mm at 1.5 Hz. By comparison, the dithering test is a very short stroke high cycle test whose testing protocols mimic components operating in high vibratory fields. The dithering test parameters included a 0.5 in. diameter ball, 20 lb. applied load, 500,000 cycles at 30 Hz, and a stroke length of 0.45 mm.
The results shown in Figs. 13 and 14 compare the trivalent chromium plated parts and a standard hexavalent chromium plated part for their performance in ball-on-flat reciprocating tests and ball-on-flat dithering wear tests, respectively. The data is plotted versus wear scar cross sectional area, which is a measurement of the wear scar by profilometer where a stylus is traversed across the scar at several locations. From this the cross sectional area can be determined and is proportional to the volume of material removed. The depth was also captured and is presented.
In general, the chromium deposit from the trivalent bath shows equivalent or superior performance to chromium plated from a hexavalent bath in wear resistance, measured by depth and area of wear scars for the Al2O3 ball. Trivalent chromium plating performed similarly to hexavalent chromium plating with the M-50 ball, with a caveat that there was an observed and measured transference of material at higher loads. The material debris introduces a third component to the wear, effectively known as third body wear, wherein the debris particles from the sample surface become abrasive particles upon further surface abrasion testing, hence increasing the wear depth and area scar for the trivalent chromium coating. It should be noted that alumina is generally more abrasive to chromium coatings, resulting in increased traction loads and wear, while M-50 is typically not very abrasive to hexavalent chromium coatings. Therefore the caveat seen in the M-50 test is not directly conducive to abrasive testing but tested for material selectivity purposes.
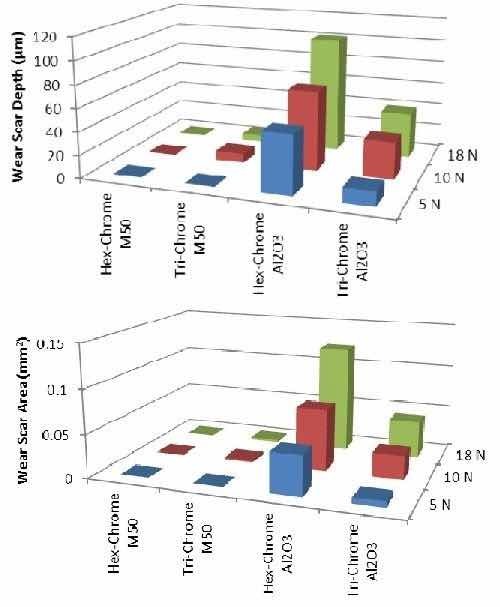 Figure 13 - Data from ball-on-flat reciprocating wear test: (top) wear scar depth and (bottom) wear scar area.
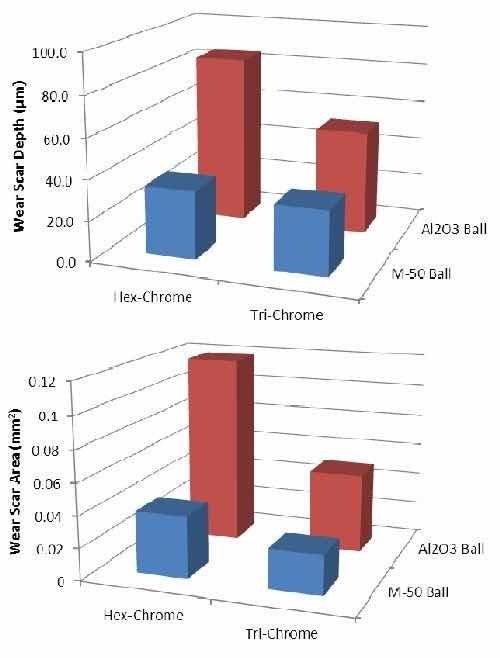 Figure 14 - Data from ball-on-flat oscillation dithering wear tests: (top) wear scar depth and (bottom) wear scar area.
Conclusions
We have demonstrated the feasibility of plating chromium coatings from a benign trivalent bath onto hard- to-access, interior surfaces of industrial parts, using our additive-free trivalent chromium process with pulse reverse waveforms. The chromium coating was applied to the internal diameters of 4130 steel pipes of varying length. On demonstration of a visually uniform coating on the internal ID of 11⁄2 in. ID and 4 in. long pipes, we scaled up the process to longer lengths (6 in. and 8 in.) and a larger diameter (3 in.). The data indicated that the physical properties of the chromium coating produced via the trivalent plating process exhibited similar properties to chromium coatings produced using the conventional hexavalent chromium process, in terms of porosity, hardness, adhesion and wear resistance.
Additionally, the trivalent process was designed to mimic existing commercial plating processes so that the installation of the new process would simulate a true drop-in replacement. This effort ensured the development of the process to industrial standards. Steve Gaydos (Technical Fellow at Boeing Research and Technology) and Bruce Griffin (Associate Technical Fellow at Boeing) noted the following:
- Based on the holder design and flow scheme, the as-built system looks very similar to traditional hexavalent chromium plating systems. It is nearly a true drop-in replacement.
- Changing from our conventional hexavalent chromium process to one in which the chromium coating is produced from the developed trivalent chromium electrolyte would only require the additional capital expenses of a new power supply and dimensionally-stable anodes.
- Coating the internal diameter of a pipe 8 in. long with a 11⁄2 in. diameter is practical and inexpensive (compared to other ID coating processes) with this non-line-of-sight process.
- The plating conditions developed to date appear to produce coatings that are potentially easily scalable.
- The chromium coating produced from this process has previously demonstrated the desired hardness, corrosion resistance, thickness, adhesion and wear resistance.
- This process has the potential to negate the need for additional drawings or specification to be developed before implementation.
Acknowledgement: This study is supported by the US EPA SBIR Program (EP-D-11-044), the National Center for Manufacturing Sciences (NCMS - 200944-140427) and private sources. The financial support of Faraday Technology, Inc. corporate R&D is also gratefully acknowledged.
References
- R. Ember, Chemical and Engineering News, February 18, 1991.
- J. Hanson, Chemical and Engineering News, June 3, 1991.
- “12th Report on Carcinogens,” National Toxicology Program, US Department of Health and Human Services, 2011.
- E. Shahin, Plating and Surface Finishing, 79 (8), 19, 1992.
- L. Snyder, Products Finishing, 61, (August, 1989).
About the Authors
Mr. Burhanuddin S. Kagajwala is a Senior Scientist at Faraday Technology Inc. He received his B.E. degree in Electronics from Mumbai University in 2008 and his M.S degree from the University of Houston in 2010. His graduate research work was focused on studying the effects of additives in electroplated permalloy (Ni-Fe) films. Currently, he is contributing to different aspects of electrochemistry related to the electroplating of copper, Co-Mn alloys and trivalent chromium, as well as the electroetching of titanium and stainless steel.
Dr. Timothy D. Hall is a Principal Scientist at Faraday Technology, Inc. He received his B.S. degrees from West Virginia University in Chemical Engineering and Mathematics and his Doctorate from the University of Notre Dame in Chemical Engineering. Currently, he is working to develop plating and polishing processes for various applications including: hard chromium landing gear coatings, nitinol stent finishing, solid oxide fuel cell chromia diffusion barrier coatings, through-mask etching, and polishing processes for high aspect ratio cavities. Dr. Hall has co-authored four patent applications, is a member of the Electrochemical Society, and was a co-recipient of a 2011 R&D 100 award.
Dr. Maria E. Inman is the Research Director at Faraday Technology Inc. She holds a B.E. in Metallurgical and Materials Engineering and a Ph.D. in Materials Engineering from the University of Auckland, New Zealand. Prior to joining Faraday Technology, she completed a two-year term as a post-Doctoral research associate at the Center for Electrochemical Science and Engineering at the University of Virginia. While Dr. Inman has recently focused on electrodeposition of chromium coatings from an environmentally-benign trivalent plating bath, electropolishing of passive materials including nitinol, and development of life prediction models for organic coatings, her role on all programs is as an Internal Consultant.
Dr. E. Jennings Taylor is the Chief Technical Officer and Intellectual Property Director at Faraday Technology, Inc., Clayton, Ohio. He founded the company to develop and commercialize innovative electrochemical technology using pulse/pulse reverse electric fields. He delivered the William Blum Scientific Achievement award address at SUR/FIN 2008 in Indianapolis, IN. He received his B.A. in Chemistry from Wittenberg University, his M.A. in Technology Strategy and Policy from Boston University, and his M.S. and Ph.D. degrees in Materials Science from the University of Virginia. He has published more than 125 technical papers and articles and holds 30 patents. He serves as Chairman of the AESF Foundation Research Board.
Mr. Bruce Griffin is an Associate Technical Fellow with The Boeing Company with 30 years experience in chemical milling and light metal finishing. Bruce’s primary work responsibilities include evaluation of surface treatment technologies that may serve as a replacement for hexavalent chromium. Bruce holds a B.S in Mechanical Engineering Technology from Lake Superior State University, Sault Ste. Marie, MI, and a Masters in Manufacturing Engineering from Washington University, St. Louis, MO.
Mr. George Cushnie, of Advanced Tooling Corporation, has extensive experience in the metal finishing field through management of numerous projects with private industry and the U.S. Defense Department. The majority of these projects have involved implementation of innovative technology improvements for electroplating processes and pollution control. Presently, he is Vice President of both Advanced Tooling Corporation and CAI Resources. He has written numerous books, articles and conference papers on electroplating and related pollution prevention topics. Since 1995, Mr. Cushnie has operated the National Metal Finishing Resource Center (NMFRC), which is supported by U.S. EPA. His education includes advanced degrees in environmental engineering and systems engineering. Mr. Cushnie was a 2010 recipient of the DoD Excellence Award winner and 2011 DOD Best Ideas Contest winner for “no mask conforming anodes.”
Mr. Randal (Randy) Taylor, of Advanced Tooling Corporation, is an expert in metal finishing with more than 40 years of experience as a plating shop manager, owner and industrial process engineer. He has spent much of that time working in and around the aircraft and aerospace industry. He founded Plating Perceptions, Inc. in 1989, a NADCAP approved metal finishing facility in Ohio, which performs hard chromium, cadmium and nickel coatings for a wide variety of customers. In 2004, Mr. Taylor teamed up with colleague George Cushnie and formed the Advanced Tooling Corporation, which has successfully improved industrial plating systems of all types and sizes. The results of these efforts have made significant improvements on process performance at military depots and private OEMs throughout the USA, Canada and the UK. Mr. Taylor was a 2010 recipient of the DoD Excellence Award winner and 2011 DOD Best Ideas Contest winner for “no mask conforming anodes.”
Dr. Mark Jaworowski is a Principal Research Engineer in the Physical Sciences Department of United Technologies Research Center (UTRC). He earned a B.S. degree in Chemical Engineering, and M.S. and Ph.D. degrees in Metallurgy from the University of Connecticut. Dr. Jaworowski holds 26 U.S. patents and has authored numerous technical papers and presentations in the area of surface finishing and protection.
Dr. Joseph T. Bonivel, Jr. is a Senior Research Engineer for the Physical Sciences department at United Technologies Research Center (UTRC). He holds a Bachelor of Science degree in Mechanical Engineering from University of South Carolina, a Master’s degree in Mechanical Engineering from Carnegie Mellon University and a Ph.D. in Mechanical Engineering from the University of South Florida in research conjunction with Carnegie Mellon University. Dr. Bonivel is a trained tribologist with most of his research based primarily on material characterization and tribology process modeling and optimization. Currently Dr. Bonivel conducts mechanical testing of materials, failure analysis and wear studies at UTRC for the business unit objectives for United Technology Corporation. He has authored two patent applications for novel slurry development for chemical mechanical polishing, and several modeling papers within the same tribosystem sub group.


